Quick Verdict: The right sandpaper grit chart tells you exactly which abrasive to reach for on every project, saving you wrecked surfaces and wasted time. For most wood projects, you start at 80-grit to remove stock, move through 120 and 180, and finish at 220-grit before applying stain or paint. CAMI and FEPA grading systems label the same paper differently, so knowing both numbers prevents hardware-store confusion. Follow the grit progression in this guide for smoother results with less effort on every sanding job.
Last updated: April 2026 | 9 min read
What Is a Sandpaper Grit Chart?
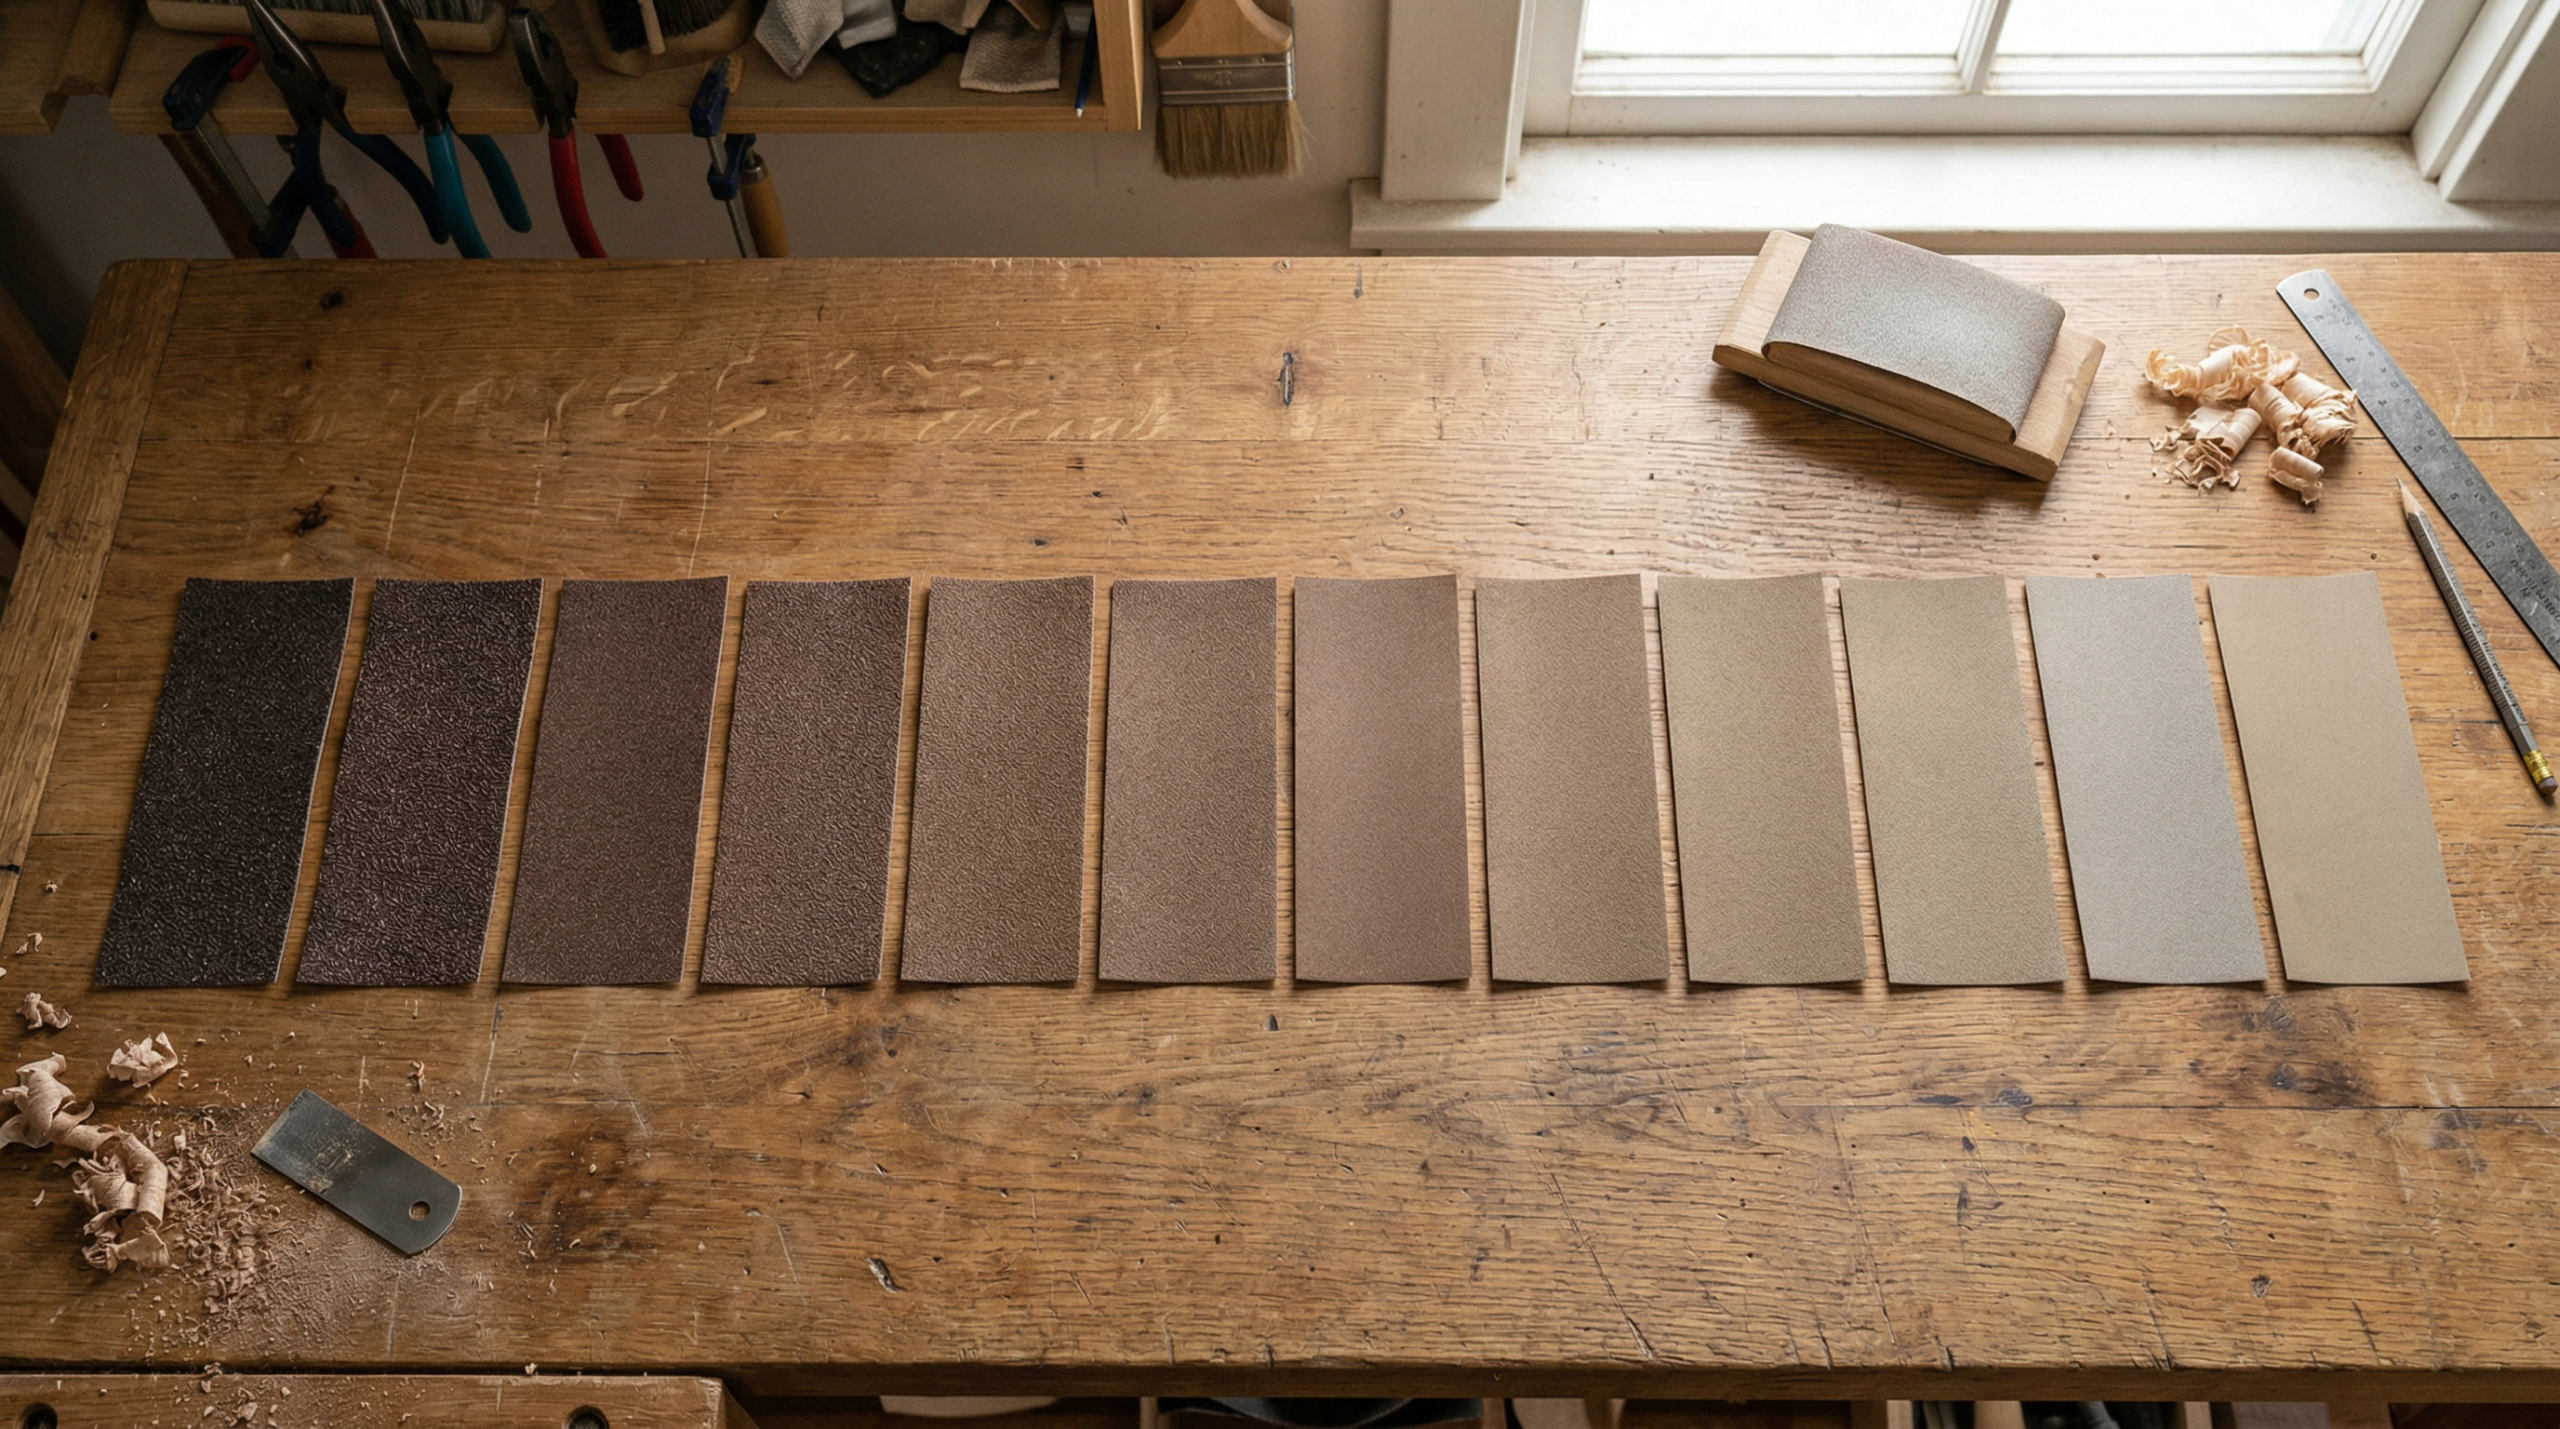
A sandpaper grit chart maps every standard abrasive grit size to the task it performs best, from heavy material removal all the way down to final-coat finishing. Specifically, the number printed on the back of every sheet tells you how many abrasive particles fit across one linear inch of the surface. As a result, lower numbers mean bigger, coarser particles; higher numbers mean smaller, finer ones. From years of sanding projects in my workshop, I’ve seen how one wrong grit choice, going too coarse before staining or too fine before paint adhesion, sends you back to square one. Because avoiding those mistakes matters on every project, this guide covers every grit from 24 to 1000, explains the two competing grading standards, and tells you exactly which sequence to use for wood, drywall, metal, and paint work.
The abrasive grit sizes you encounter at any hardware store follow one of two standards: CAMI (the North American system) or FEPA (the European P-grade system). For grits up to 220, the two systems are nearly identical. Above 220, however, the numbers diverge noticeably, which causes real confusion on finishing projects. Consequently, the sandpaper grit chart below covers both systems so you always know which sheet to grab.
Key Facts: Grit Ranges at a Glance
| Grit Range | Grade Name | Common Uses |
|---|---|---|
| 24–36 | Extra Coarse | Stripping paint, removing heavy stock, floor refinishing |
| 40–60 | Coarse | Shaping wood, removing old finish, rough leveling |
| 80–120 | Medium | General wood sanding, first-pass smoothing, prep before finer grits |
| 150–220 | Fine | Final sanding before stain or paint, drywall finishing |
| 240–320 | Superfine | Between finish coats, light scuffing for adhesion |
| 360–600 | Extra Fine | Between coats of polyurethane or lacquer, metal prep |
| 800–1000+ | Ultra Fine | Wet sanding clear coat, automotive finishing, polishing |
Sandpaper Grit Numbers Explained
The grit number on sandpaper represents the mesh size used to sort abrasive particles during manufacturing, specifically the number of openings per linear inch in the sieve screen. A 60-grit sheet uses a screen with 60 openings per inch; the particles passing through are coarser than those sorted through a 220-mesh screen. Therefore, a bigger mesh number equals finer abrasive, which removes less material per stroke and leaves a smoother surface.
Understanding CAMI vs FEPA sandpaper standards prevents costly mistakes. CAMI (Coated Abrasive Manufacturers Institute) is the North American standard; FEPA (Federation of European Producers of Abrasives) uses a “P” prefix, so the same sheet reads “P220” in Europe and “220” in North America. Up to 220-grit, the two systems align closely. Beyond this point, they diverge: FEPA P320 is roughly equivalent to CAMI 240, and FEPA P400 is closer to CAMI 320. When shopping online or buying imports, check the prefix to know which system applies.
However, a common myth holds the number counts particles per square inch. This is incorrect. The mesh-size system classifies all standard abrasive grit sizes, and knowing this helps you read international packaging accurately.
Sandpaper Grit Chart Grades: Coarse to Ultra-Fine
Coarse medium fine sandpaper is the shorthand most DIYers know, but the full range in any complete sandpaper grit chart spans seven distinct grade tiers. Below is how each tier works in practice.
Extra Coarse (24–36 grit): These sheets are aggressive and leave deep scratches. For instance, use them only for stripping multiple layers of paint, leveling a badly uneven floor, or rough-shaping a timber. You would not use extra coarse on furniture or trim.
Coarse (40–60 grit): The go-to grit for removing old finish, flattening wood with a belt sander, or knocking down dried glue squeeze-out. A 40 or 60 leaves scratch patterns visible to the naked eye, so always follow up with finer grits.
Medium (80–120 grit): This is the workhorse range for general wood sanding. Start at 80 on rough lumber, then move to 100 or 120 to erase the 80-grit scratches. Most wood projects begin their usable sanding work here.
Fine (150–220 grit): Final prep before any coating. At 180 or 220, the wood surface accepts stain and paint evenly. Consequently, skipping straight to stain from 120 often produces blotchy results on pine and maple because the open grain still shows tool marks.
Superfine (240–320 grit): Used between coats of finish to knock down dust nibs and brush marks. A light pass with 280 or 320 after the first coat of polyurethane creates a surface the next coat bonds to more evenly.
Extra Fine (360–600 grit): Applied between final topcoats on furniture, cabinets, and metal. At 400 or 600, you are refining a finish rather than removing material from the substrate.
Ultra Fine (800–1000+ grit): The domain of wet sanding and automotive work. At these grits, you remove tiny surface imperfections in clear coats without scratching through the color below.
Which Grit for Your Project
Choosing the right grit depends on the material, its current condition, and the coating you plan to apply. Use this sandpaper grit chart section as your project-by-project reference. Below are the sequences I use most in my own shop.
Wood sanding (bare lumber): Start at 80-grit to remove mill marks and flatten the surface. Move to 120 to eliminate the 80-grit scratches, then finish at 180 or 220 before applying any finish. Hardwoods like oak and maple close their grain well at 180; softer woods like pine benefit from stopping at 180 to keep pores open for even stain penetration.
Removing paint: Use 40 or 60-grit on a belt sander or random-orbit sander to strip paint quickly. Follow with 80 and then 120 to restore the substrate before repainting. Trying to remove paint with anything finer than 60 is slow and clogs the paper fast.
Sanding before staining: Always finish at 180 or 220 before applying an oil or water-based stain. Stopping at 120 leaves scratches filling with stain and appearing darker than the surrounding wood, producing an uneven look. For whitewashing or light-wash techniques, 220 is the right stopping point for a consistent base.
Drywall: Use 100 or 120 on a pole sander to knock down joint compound ridges, then switch to 150 for the final pass. Going coarser than 100 on drywall risks gouging the paper face of the board, which paints poorly.
Metal: Start at 80 or 120 to remove rust or old paint, then progress to 180 or 220 for a clean surface ready for primer. Aluminum calls for 320 or finer for a polished look.
Between finish coats: 320-grit between polyurethane or lacquer coats is a reliable standard. Some finishers use 400 on the penultimate coat for an even smoother final surface.
Grit Progression: How to Sand in Stages
A proper sanding grit progression is the single biggest factor separating a smooth, professional surface from a blotchy, scratched one. Print this sandpaper grit chart section and tape it to your shop wall; the sequences below answer the most common questions before they arise. The rule is straightforward: never skip more than one grit step. Jumping from 80 to 220 leaves deep scratches requiring extra time to remove, and often those scratches remain visible under finish.
For example, a standard wood furniture sequence runs: 80 → 120 → 180 → 220. Similarly, refinishing a floor follows a heavier sequence: 36 → 60 → 80 → 120. Each step removes the scratch pattern left by the previous grit. Before moving to the next grit, wipe the surface clean and check at a raking angle under a light. If you still see scratches from the previous grit, keep going at the current step before advancing.
For cabinets receiving multiple finish coats, the sanding grit progression extends further: 80 → 120 → 180 → 220 (substrate), then 320 between coats, and 400 before the final coat. This sequence produces the kind of surface where each coat lays down flat with no trapped scratch marks.
| Project | Grit Sequence |
|---|---|
| Pine furniture (new lumber) | 80 → 120 → 180 |
| Oak or maple furniture | 80 → 120 → 180 → 220 |
| Hardwood floor refinish | 36 → 60 → 80 → 120 |
| Cabinet with polyurethane topcoats | 80 → 120 → 180 → 220, then 320 between coats |
| Drywall seams | 100 → 120 → 150 |
| Metal (rust removal to primer) | 80 → 120 → 180 → 220 |

Types of Sandpaper: Abrasive Materials and Backing
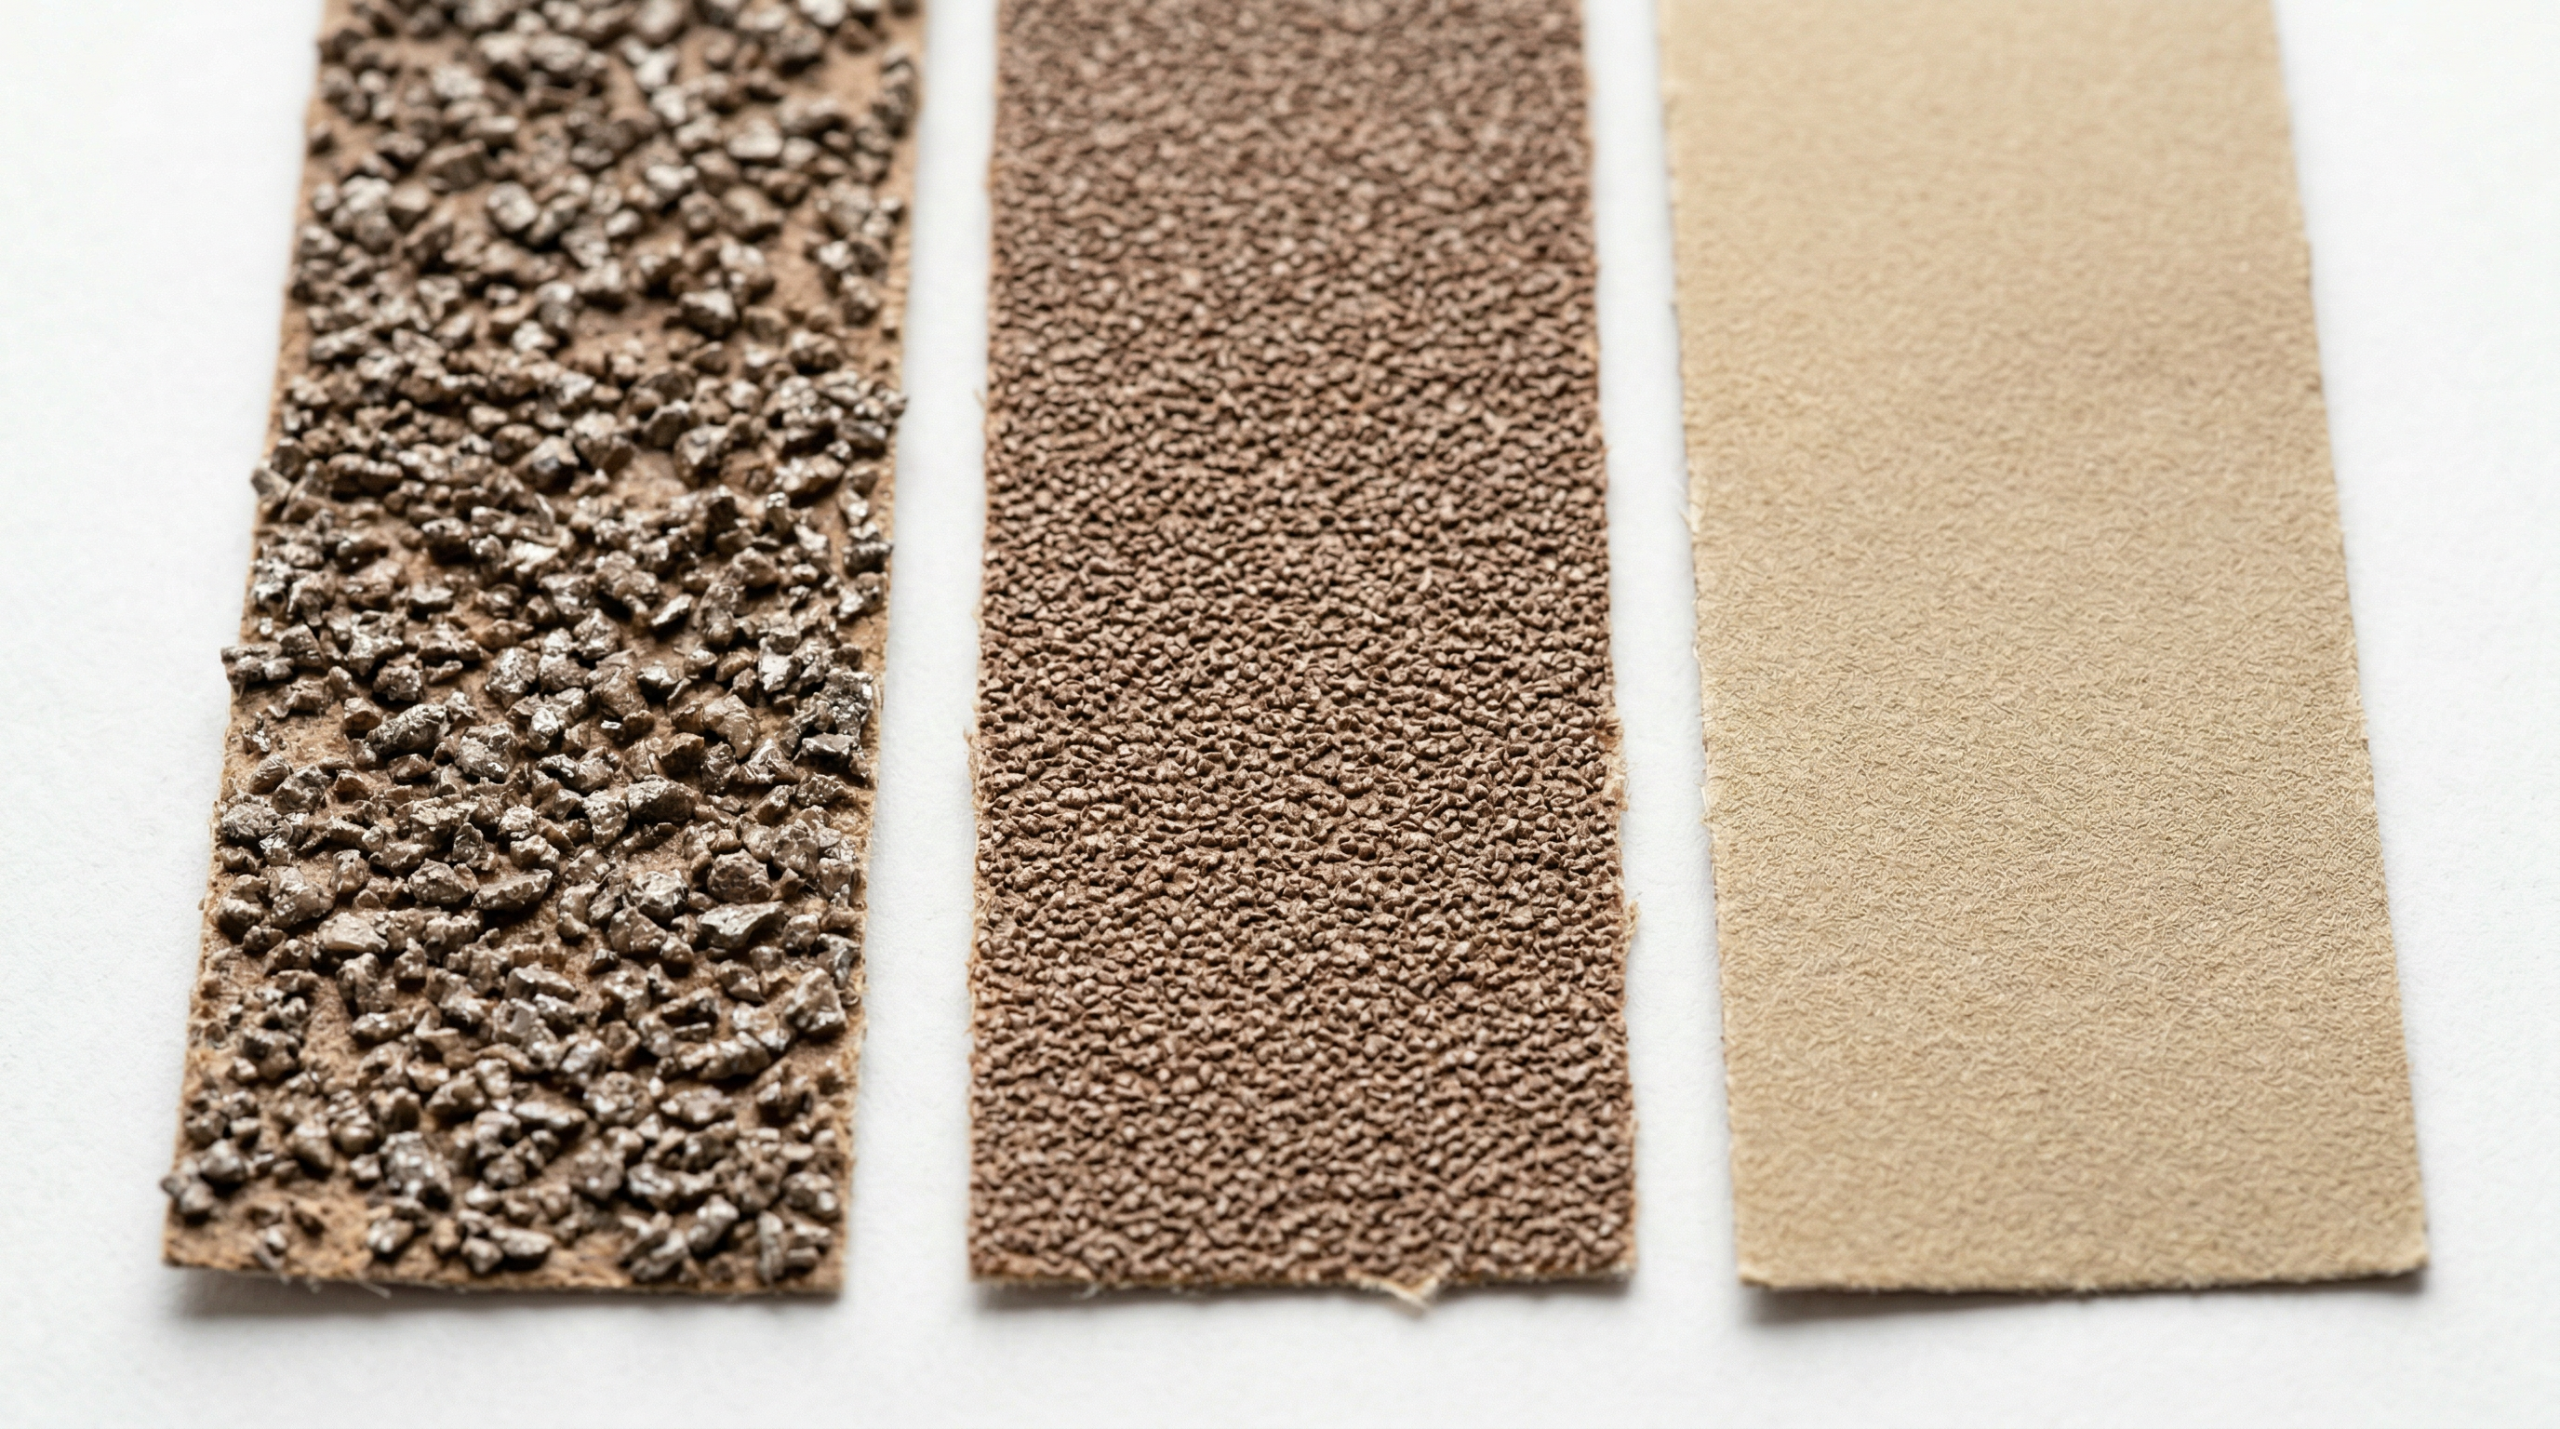
The grit number tells you the size of the abrasive particles, but the mineral type and backing determine how long the paper lasts and how it performs under load. No sandpaper grit chart is complete without covering abrasive materials. When comparing aluminum oxide vs silicon carbide, each mineral fits different applications.
Aluminum oxide is the most common abrasive for wood, and for good reason. It is hard, durable, and self-fracturing. As particles dull, they break and expose fresh sharp edges, which extends sheet life. Most general-purpose sandpaper you find at home improvement stores uses aluminum oxide. Silicon carbide is sharper and harder than aluminum oxide, making it better suited for sanding between finish coats, wet sanding, and working on hard materials like glass, ceramic, and metal. In contrast, you identify each type easily by color: silicon carbide sheets are often black or dark gray, while aluminum oxide sheets are typically tan or orange-brown. When weighing aluminum oxide vs silicon carbide overall, aluminum oxide wins for wood longevity while silicon carbide wins for finish refinement.
Garnet sandpaper is a natural abrasive wearing faster than aluminum oxide, but its particles fracture into progressively finer edges as the sheet wears down. Woodworkers use garnet for final hand-sanding passes because it produces a surface accepting stain with exceptional evenness. Ceramic and zirconia abrasives appear on heavy-duty belts and discs where high heat and heavy stock removal demand maximum durability.
Backing type affects how the paper handles. Standard paper backing works fine for hand sanding flat surfaces but tears on contoured or curved work. Cloth backing survives the stress of belt sanders and handles curved surfaces better. Film backing (polyester film) is dimensionally stable and resists moisture, which makes it the standard choice for wet sanding and automotive applications. Open-coat sandpaper has spaces between the abrasive particles, so sawdust and soft material do not clog the surface as quickly. Closed-coat paper packs the abrasive tighter, cutting faster on hard materials but loading up quickly on softwood or paint. For pine or when stripping paint, reach for open-coat; for hardwood finishing, closed-coat holds up well.
Wet Sanding vs. Dry Sanding
Wet sanding uses water or mineral spirits as a lubricant between the paper and the surface. Coarse medium fine sandpaper all belongs in the dry-sanding category; the ultra-fine grits at 400 and above cross into wet-sanding territory. The liquid flushes away particles as you work, preventing them from scratching the finish you are trying to refine. Dry sanding removes material faster and works on bare substrates; wet sanding is slower but produces a finer, more uniform result on finish coats.
Use wet sanding at 400-grit and above, primarily on clear coats, lacquer, varnish, and automotive paint. At 600 to 1000-grit with water, you remove orange peel texture from a glossy topcoat without cutting through the color layer underneath. After wet sanding, follow up with polishing compound to restore gloss.
Dry sanding covers almost every other situation: bare wood, drywall, metal prep, and any intermediate sanding during furniture or cabinet finishing. Avoid wet sanding raw wood because water raises the grain and swells the fibers, which undoes the smoothness you are working toward. Similarly, wet sanding drywall introduces moisture, softening the joint compound and damaging the paper face of the board.
Sanding Safety Tips

Sanding dust is a genuine respiratory hazard, particularly when working with hardwoods, MDF, or painted surfaces pre-dating lead abatement. Fine particles below 10 microns stay suspended in the air long after you stop sanding and deposit deep in the lungs. Wearing an N95 respirator instead of a basic dust mask blocks these fine particles; a paper dust mask does not filter particles fine enough to block harm with extended exposure.
In addition, eye protection is non-negotiable when using a belt sander or angle grinder with a sanding disc. These tools throw abrasive particles at high velocity. Safety glasses with side shields provide adequate protection; standard reading glasses do not.
Ventilation matters as much as personal protection. Specifically, open windows, set up a box fan to exhaust air out of the workspace, and use a dust collector or shop vacuum connected to your sander whenever the tool has a port for one. For projects involving old paint, especially in homes built before 1978, test for lead before sanding and follow EPA RRP guidelines if lead is present. Building a project like a plywood chair from bare sheet goods involves a lot of edge sanding where a connected shop vacuum eliminates most of the airborne dust before it spreads, and knowing how to glue wood properly for those joints is equally important.
Hand Sanding vs. Orbital Sander vs. Belt Sander
| Method | Best For | Drawbacks | Grit Range |
|---|---|---|---|
| Hand Sanding | Detail work, contours, final passes, small surfaces | Slow on large areas; uneven pressure causes dips | All grits, especially 150–400 |
| Random-Orbit Sander | Flat surfaces, panels, furniture tops; swirl-free finish | Leaves swirl marks if you rush through grits; slower material removal than belt | 60–220 most common |
| Belt Sander | Rapid stock removal, floor refinishing, shaping | Aggressive; removes material fast; not for detail or finish work | 36–120 typical |
For most DIY furniture and cabinet work, a random-orbit sander paired with hand sanding for final passes covers every stage of the project. The belt sander is a specialty tool best reserved for heavy tasks like floor refinishing or edge-jointing boards. A cordless random-orbit sander paired with a reliable cordless drill forms the core of a practical DIY power-tool setup for surface prep work.
Common Sanding Mistakes to Avoid
Even experienced DIYers repeat these mistakes. Recognizing them beforehand saves hours of rework and wasted finish coats.
- Stopping at 120-grit before staining: scratches absorb stain unevenly, producing dark streaks and blotches across the entire surface. Always progress to at least 180 before applying any penetrating stain.
- Skipping grits in the progression: jumping from 80 straight to 220 leaves deep 80-grit scratches the finer paper never fully removes. Each step should advance no more than one increment (80 to 120, not 80 to 220).
- Over-sanding pine and softwoods beyond 220: the grain closes and burnishes, blocking stain from penetrating. For pine, stop at 180; for hardwoods, 220 is the ceiling before staining.
- Wet sanding bare wood: water raises the grain and swells fibers, undoing all the smoothing you accomplished. Reserve wet sanding for cured finish coats at 400-grit and above.
- Using closed-coat paper on resinous softwoods: the tightly packed abrasive loads up with pitch and sawdust within minutes. Switch to open-coat sheets for pine, cedar, and any paint-stripping work.
- Ignoring dust between grit changes: residual coarse particles from the previous grit scratch the surface when you move to a finer sheet. Wipe down with a tack cloth or vacuum between every grit step.
Final Verdict
A reliable sandpaper grit chart removes the guesswork from every sanding decision and prevents the surface failures sending most beginners back to the hardware store mid-project. The practical takeaway: start at the coarsest grit your surface condition requires, work through each step without skipping more than one increment, and stop at 180 or 220 for staining, and 150 or 180 for painting. Match your abrasive mineral to the material: aluminum oxide for wood, silicon carbide for finishes and metal. Choose open-coat paper any time you are working with soft or resinous wood. From my years of DIY projects, the single most common sanding mistake is stopping at 120 before staining; the uneven absorption afterward is avoidable with one more step at 180 or 220. Follow this guide, use the grit sequences in the tables above, and your surfaces accept every finish coat cleanly and evenly.
Frequently Asked Questions
What grit sandpaper for wood?
For bare wood, start at 80-grit to remove mill marks and rough the surface, then progress to 120 and finish at 180 or 220 before applying any coating. Hardwoods like maple and oak finish well at 180; softer woods like pine benefit from stopping at 150 to 180 to keep the grain open enough for even stain absorption. Skipping steps leaves scratch marks showing through stain and first coats of paint.
What grit sandpaper to remove paint?
Use 40 or 60-grit to strip paint efficiently. Coarser than 40 risks gouging wood, and anything finer than 60 loads up with paint residue too quickly to be practical. On a belt sander or random-orbit sander, 40-grit removes multiple paint layers fast. After stripping, follow up with 80 and then 120 to prepare the surface for primer or new paint.
What grit sandpaper before staining?
Sand to 180 or 220 before applying any penetrating stain. Stopping at 120 leaves scratches filling with stain pigment and appearing darker than the surrounding wood, producing an uneven, blotchy result. On wide open-grained woods like red oak, stopping at 180 allows the stain to penetrate the grain properly. For tight-grained maple, however, finish at 220 and avoid burnishing, which blocks stain entry entirely.
What grit sandpaper for drywall?
Use 100 or 120-grit on a pole sander to knock down high spots in dried joint compound, then follow with 150 for the final smoothing pass. Avoid anything coarser than 100 on drywall; the paper face of the board damages easily under aggressive abrasives. Once you reach 150 and the seams feel smooth under your hand, the surface is ready for primer.
What grit sandpaper between coats of polyurethane?
Sand between polyurethane coats with 320-grit. The goal is to knock down dust nibs and brush marks without cutting through the finish coat below. After the final coat of polyurethane, a pass with 400-grit followed by ultra-fine steel wool (0000 grade) or 600-grit sheet produces a smooth, low-sheen surface. Always wipe away dust with a tack cloth before applying the next coat.
What do sandpaper grit numbers mean?
Grit numbers represent the mesh size used to sort abrasive particles during manufacturing. The number indicates how many openings per linear inch the sorting screen contains. For example, a 60-grit screen has 60 openings per inch, producing larger, coarser particles. Conversely, a 220-grit screen has 220 openings per inch, producing much finer particles. Higher grit number equals finer abrasive; lower number equals coarser abrasive with more aggressive material removal. CAMI vs FEPA sandpaper numbering diverges above 220, so always refer to a sandpaper grit chart to cross-reference both systems before ordering fine-grit sheets online.
Wet sanding vs. dry sanding: when to use each?
For all substrate work, including bare wood, drywall, metal prep, and intermediate steps between finish coats, dry sanding is the standard approach. In contrast, wet sanding at 400-grit and above serves cured clear coats, lacquer, varnish, and automotive paint, where water lubricates the surface and flushes particles away to prevent scratching the finish. Never wet-sand bare wood, as moisture raises the grain and swells fibers. Also avoid wet sanding drywall, since water softens joint compound and damages the board face.


Leave a Reply