Quick Verdict: Most common dryer repairs cost between $5 and $55 in parts, compared to the $180+ average service call a technician charges. A blown thermal fuse runs about $8, a replacement belt around $20, and a new heating element between $20 and $50. Eight repairs in this guide cover the vast majority of dryer failures a homeowner encounters, and all of them require basic hand tools you likely already own.
Last updated: April 2026 | 11 min read
In This Article
- Why DIY Dryer Repair Makes Sense
- Key Facts at a Glance
- Safety First
- Tools You Need for Common Dryer Repairs
- Repair #1: Dryer Not Heating
- Repair #2: Dryer Won’t Start
- Repair #3: Drum Not Spinning
- Repair #4: Takes Too Long to Dry
- Repair #5: Dryer Making Noise
- Repair #6: Dryer Overheating
- Repair #7: Gas Dryer Won’t Ignite
- Repair #8: Moisture Sensor Not Working
- Repair or Replace: Common Dryer Repairs Decision Framework
- Pros and Cons of DIY Dryer Repair
- Final Verdict
- Frequently Asked Questions
Why DIY Dryer Repair Makes Sense
The eight most common dryer repairs account for the vast majority of service calls technicians make, and every one of them falls within reach of a patient homeowner with a multimeter and a set of basic hand tools. Dryer troubleshooting follows a logical, symptom-based process: the machine either heats or it doesn’t, the drum spins or it doesn’t, and the parts responsible for each function are inexpensive and widely available. Growing up around my grandfather’s plumbing and heating company, I learned early on to diagnose appliances the same way a good mechanic diagnoses a car: start with the simplest, cheapest component and work outward from there.
The fire hazard angle alone makes routine dryer maintenance worth understanding. According to the National Fire Protection Association, an estimated 2,900 residential dryer fires are reported every year, and the leading cause is a clogged exhaust vent, not a mechanical failure. Several of the repairs in this guide address fire prevention directly, specifically vent cleaning and overheating diagnostics. After 30 years of hands-on work across everything from rough framing to finish electrical, I’ve found dryer repair to be one of the best return-on-effort tasks a homeowner takes on.
This guide walks through 8 common dryer repairs in order of how often they come up. Each repair includes a parts cost estimate, a difficulty rating, and step-by-step instructions. For context, the average appliance repair runs about $180 including labor and parts, while a thermal fuse costs $8 at the hardware store and takes 20 minutes to swap.
Key Facts at a Glance
| Data Point | Details |
|---|---|
| Average technician repair cost | ~$180 total (Angi, 2026) |
| Typical DIY parts cost range | $5-$55 |
| Most common failure cause | Clogged exhaust vent / blown thermal fuse |
| Dryer lifespan | 10-13 years (average use) |
| Annual residential dryer fires (U.S.) | ~2,900 reported (USFA/NFPA) |
| Tools needed | Multimeter, putty knife, 1/4″ nut driver, Phillips screwdriver, needle-nose pliers, shop vacuum |
| Highest-value free fix | Moisture sensor cleaning with rubbing alcohol (2 minutes) |
Safety First
Before opening any dryer cabinet, unplug the power cord from the wall outlet. Electric dryers run on 240 volts, and 240V is lethal. For reference, household receptacles for lights and outlets run on 120V; a 240V dryer circuit carries twice the load and stops a human heart reliably. I’ve worked as a remodeling electrician for years and I treat 240V circuits with more respect than any other residential hazard. Unplugging is not optional, and switching off the breaker is not a substitute: pull the cord.
Gas dryers require an additional step before any repair. Locate the gas shutoff valve on the supply line behind the unit; it typically sits within 6 inches of the dryer connection. Turn the valve 90 degrees so the handle runs perpendicular to the pipe, which closes the valve and stops gas flow. After closing the valve, move the dryer out from the wall carefully, because the flex connector is not designed to take a hard yank. For more detail on working around home electrical systems safely, the guide on common DIY electrical mistakes covers the scenarios where homeowners get into trouble.
Also note: after any repair involving the gas valve or gas line connections, smell-test for gas before running the dryer. If you detect any odor, leave the house, leave the door open, and call your gas utility from outside. No repair is worth a gas leak.

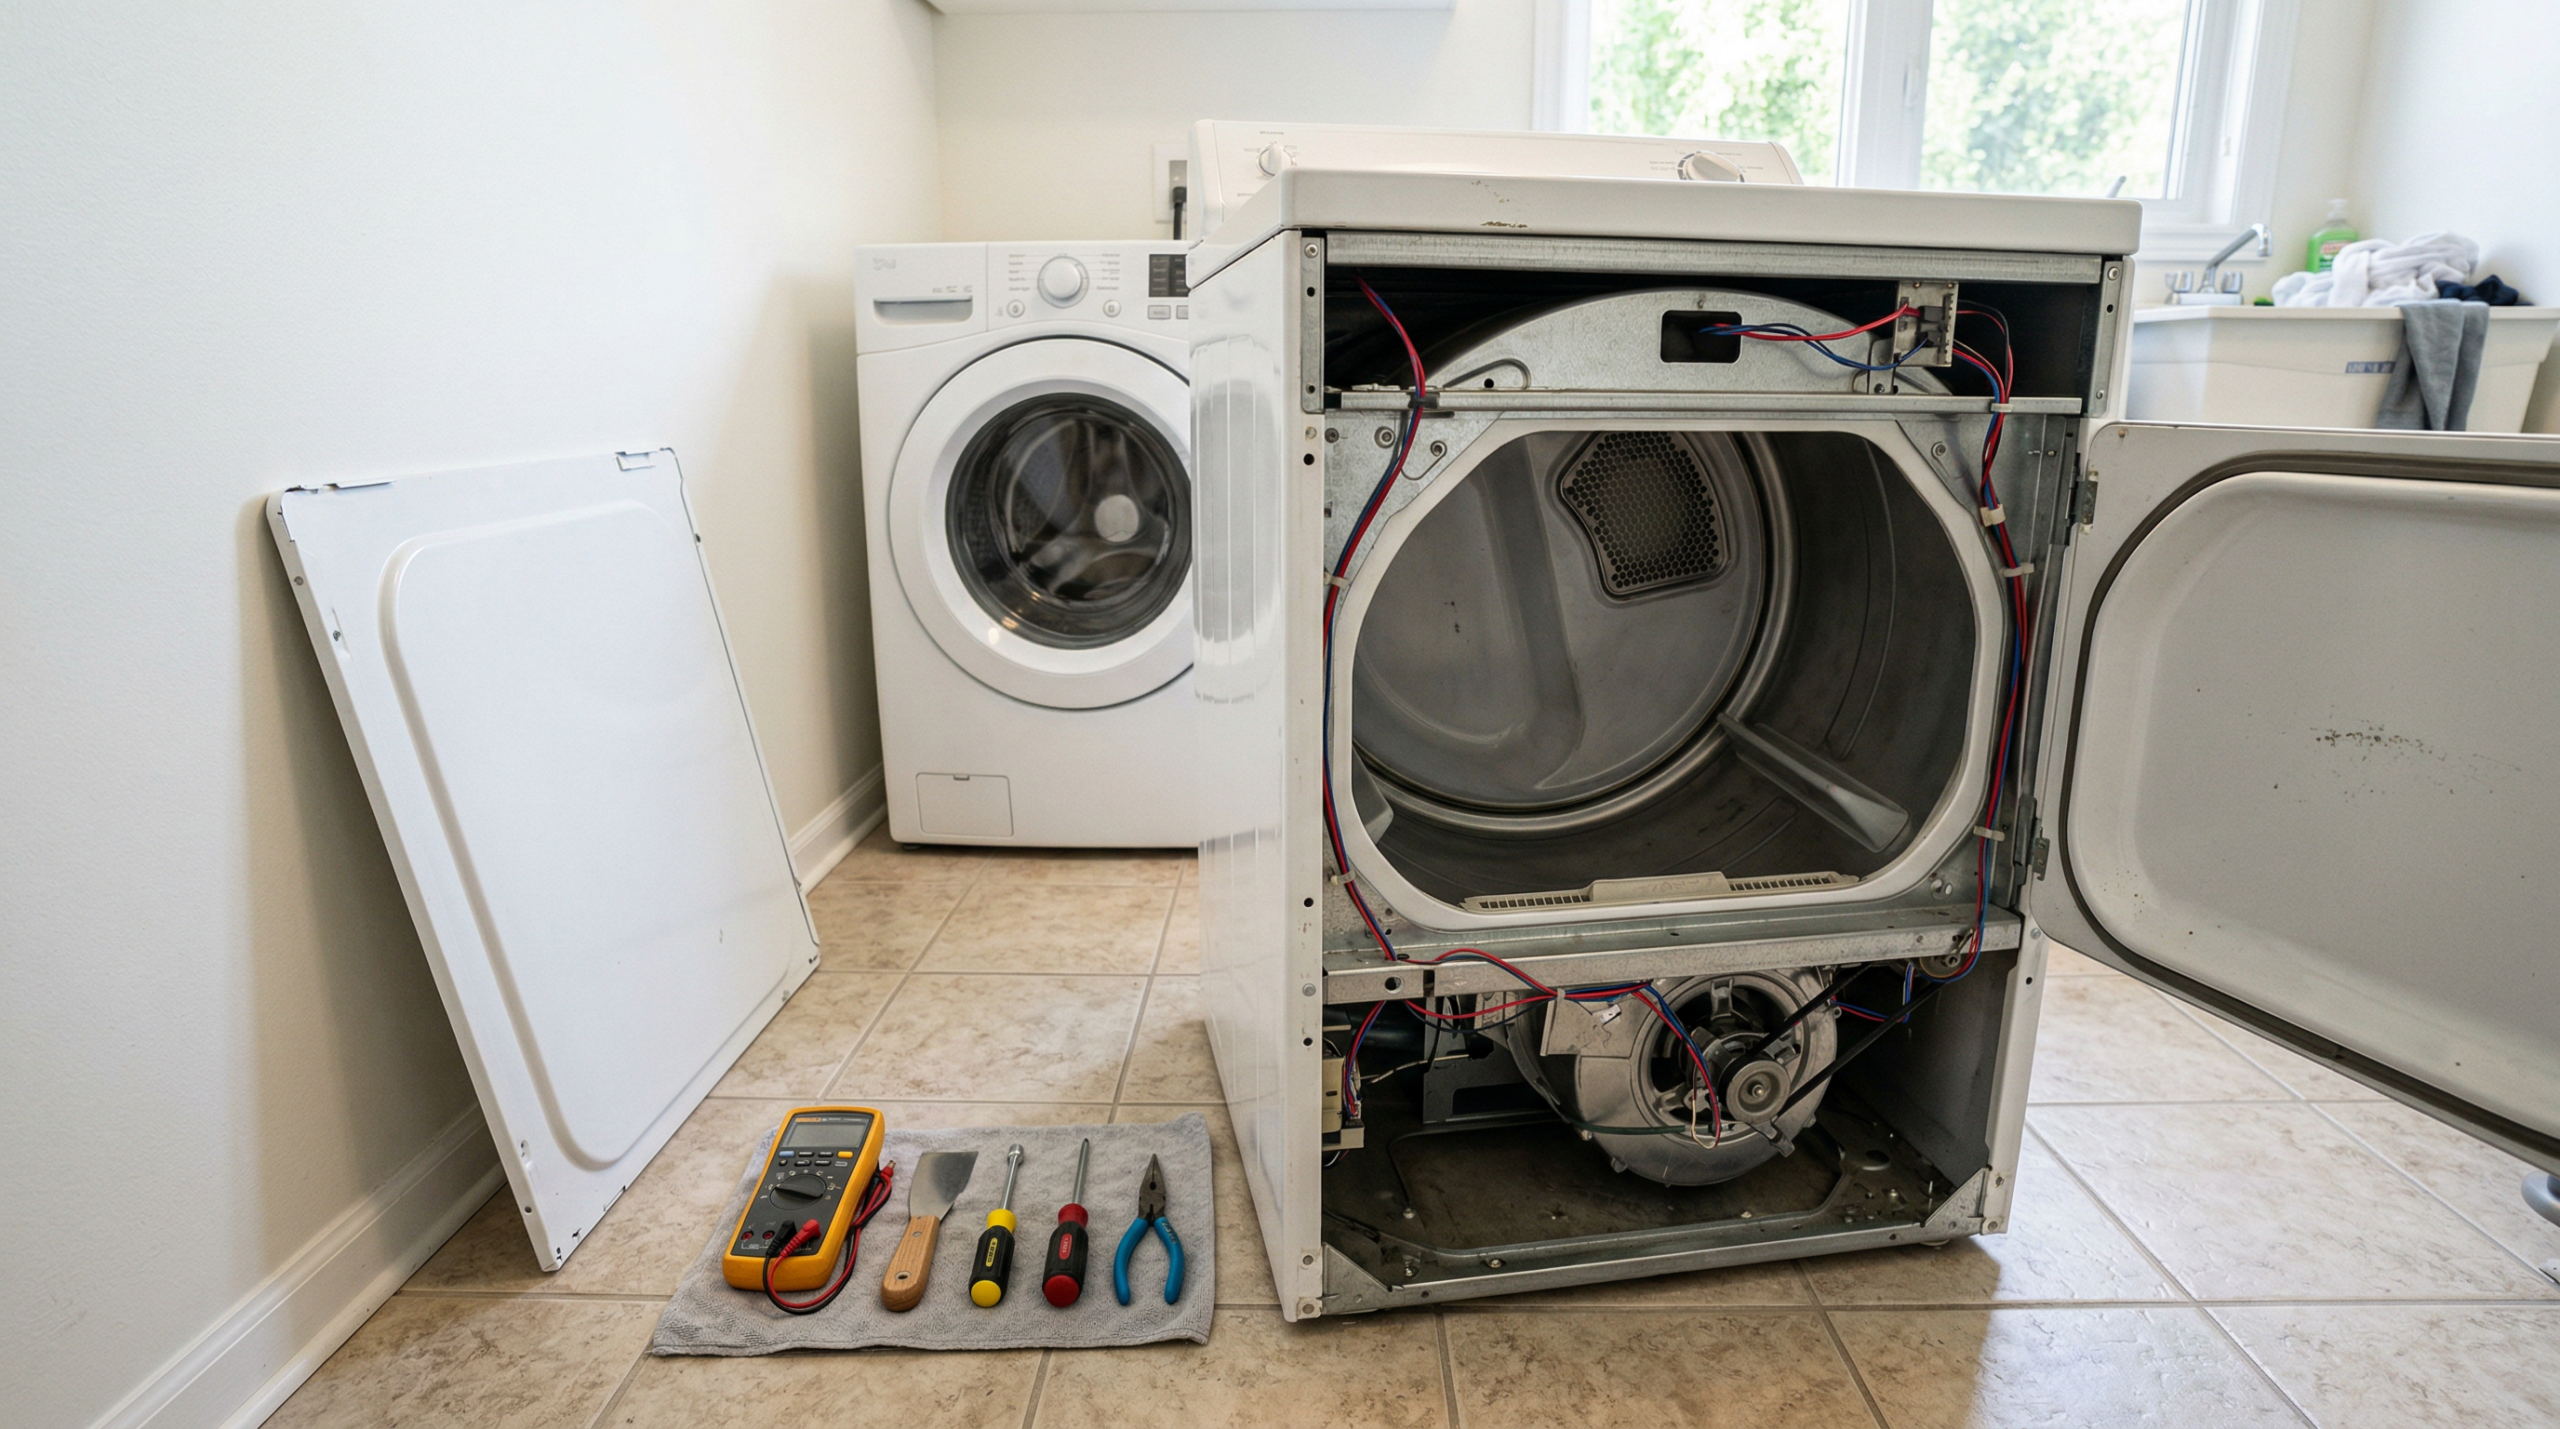
Tools You Need for Common Dryer Repairs
Six tools handle the full range of common dryer repairs in this guide. Most homeowners already own at least four of them.
- Multimeter: Used for continuity testing on thermal fuses, heating elements, thermostats, and door switches. A $20 unit from Klein Tools works fine; digital makes readings easier in low-light spaces than an analog model does.
- Putty knife: A standard 3-inch or 4-inch putty knife releases the spring clips holding the top panel on most front-load dryers. Insert it about 2 inches from each corner, push inward, and the panel lifts free.
- 1/4-inch nut driver: Dryer cabinet screws are almost universally 1/4-inch hex. A magnetic nut driver on a short handle reaches tight spots a standard screwdriver won’t reach.
- Phillips screwdriver: Used for drum roller screws, front panel fasteners, and terminal block covers. A #2 tip handles 95% of dryer fasteners.
- Needle-nose pliers: Essential for disconnecting wire connector plugs on thermal fuses, thermostats, and door switches without tearing the connector housings.
- Shop vacuum: Lint accumulates in every cavity inside a dryer. Before and after each repair, vacuum the area thoroughly. Specifically, lint in contact with a heating element is a fire waiting to happen.
Repair #1: Dryer Not Heating
A dryer not heating is the single most-searched dryer symptom online, and in most cases it traces to one of three components: the thermal fuse ($5-$18), the heating element ($20-$50), or the high-limit thermostat ($10-$25). For dryer troubleshooting, always start with the thermal fuse because it’s the cheapest part, the fastest to test, and the most common failure. I’ve replaced more thermal fuses than I remember, and a clogged vent is responsible for nearly every blown fuse I’ve seen.
Difficulty: Easy | Time: 20-40 minutes | Parts cost: $5-$50
How to Test and Replace the Thermal Fuse
- Unplug the dryer. For gas dryers, also close the gas valve.
- Remove the back panel (usually 6-8 Phillips or 1/4″ hex screws). The thermal fuse mounts on the exhaust duct near the heating element housing; it’s a small, oblong, white or silver component with two wires attached.
- Disconnect both wires using needle-nose pliers and set your multimeter to continuity mode.
- Touch one probe to each terminal on the fuse. A good fuse reads continuity (the meter beeps or reads near 0 ohms). No continuity on a blown fuse confirms replacement is needed.
- Install the new fuse, reconnect the wires, and clean the exhaust vent before running the dryer. A clogged vent is almost always what killed the original fuse, so leaving the blockage in place blows the new one within a few cycles.
If the thermal fuse tests good, move on to testing the heating element. Disconnect the element’s two terminals, set the multimeter to resistance, and probe each terminal. A working element typically reads between 5 and 50 ohms depending on the model; an open circuit (infinite ohms) means the coil is burned through. The dryer thermal fuse replacement is the easier fix at $5-$18, but heating element swaps follow the same back-panel access process and cost $20-$50 for the part. Whichever part you replace, always confirm the exhaust vent is clear before reassembling, because a remaining blockage blows the new fuse within days.
Repair #2: Dryer Won’t Start
A dryer not starting when you press the button usually comes down to four candidates: the door switch, the start switch, a blown thermal fuse, or a tripped circuit breaker. The fastest first check takes 30 seconds at your electrical panel. Electric dryers use two breaker poles, and one leg occasionally trips without the other, which means the drum motor loses power even though the drum light still works. Flip both poles fully off, then back on. If the dryer starts normally, the breaker was the problem. Otherwise, unplug the dryer before opening any panel for further diagnosis.
Difficulty: Easy | Time: 15-30 minutes | Parts cost: $8-$30
- Reset the circuit breaker as described above and also check the door latch: most dryers won’t start if the door isn’t fully closed and latched.
- If the breaker is fine, access the door switch by removing the top panel with a putty knife or by unscrewing the front panel, depending on the model. The door switch sits inside the door opening.
- Disconnect the wires from the door switch and test continuity with your multimeter. Press the plunger on the switch while probing. A good switch shows continuity when depressed and none when released. Reversed or absent results confirm a defective switch.
- Door switches cost $8 to $30 depending on brand and take about 15 minutes to swap. Reconnect the wires to the new switch, press the plunger by hand to verify the clicking action, and reassemble.
- If the door switch tests fine, check the thermal fuse using the continuity method from Repair #1. A dryer thermal fuse replacement on a won’t-start unit follows the same back-panel process described above.
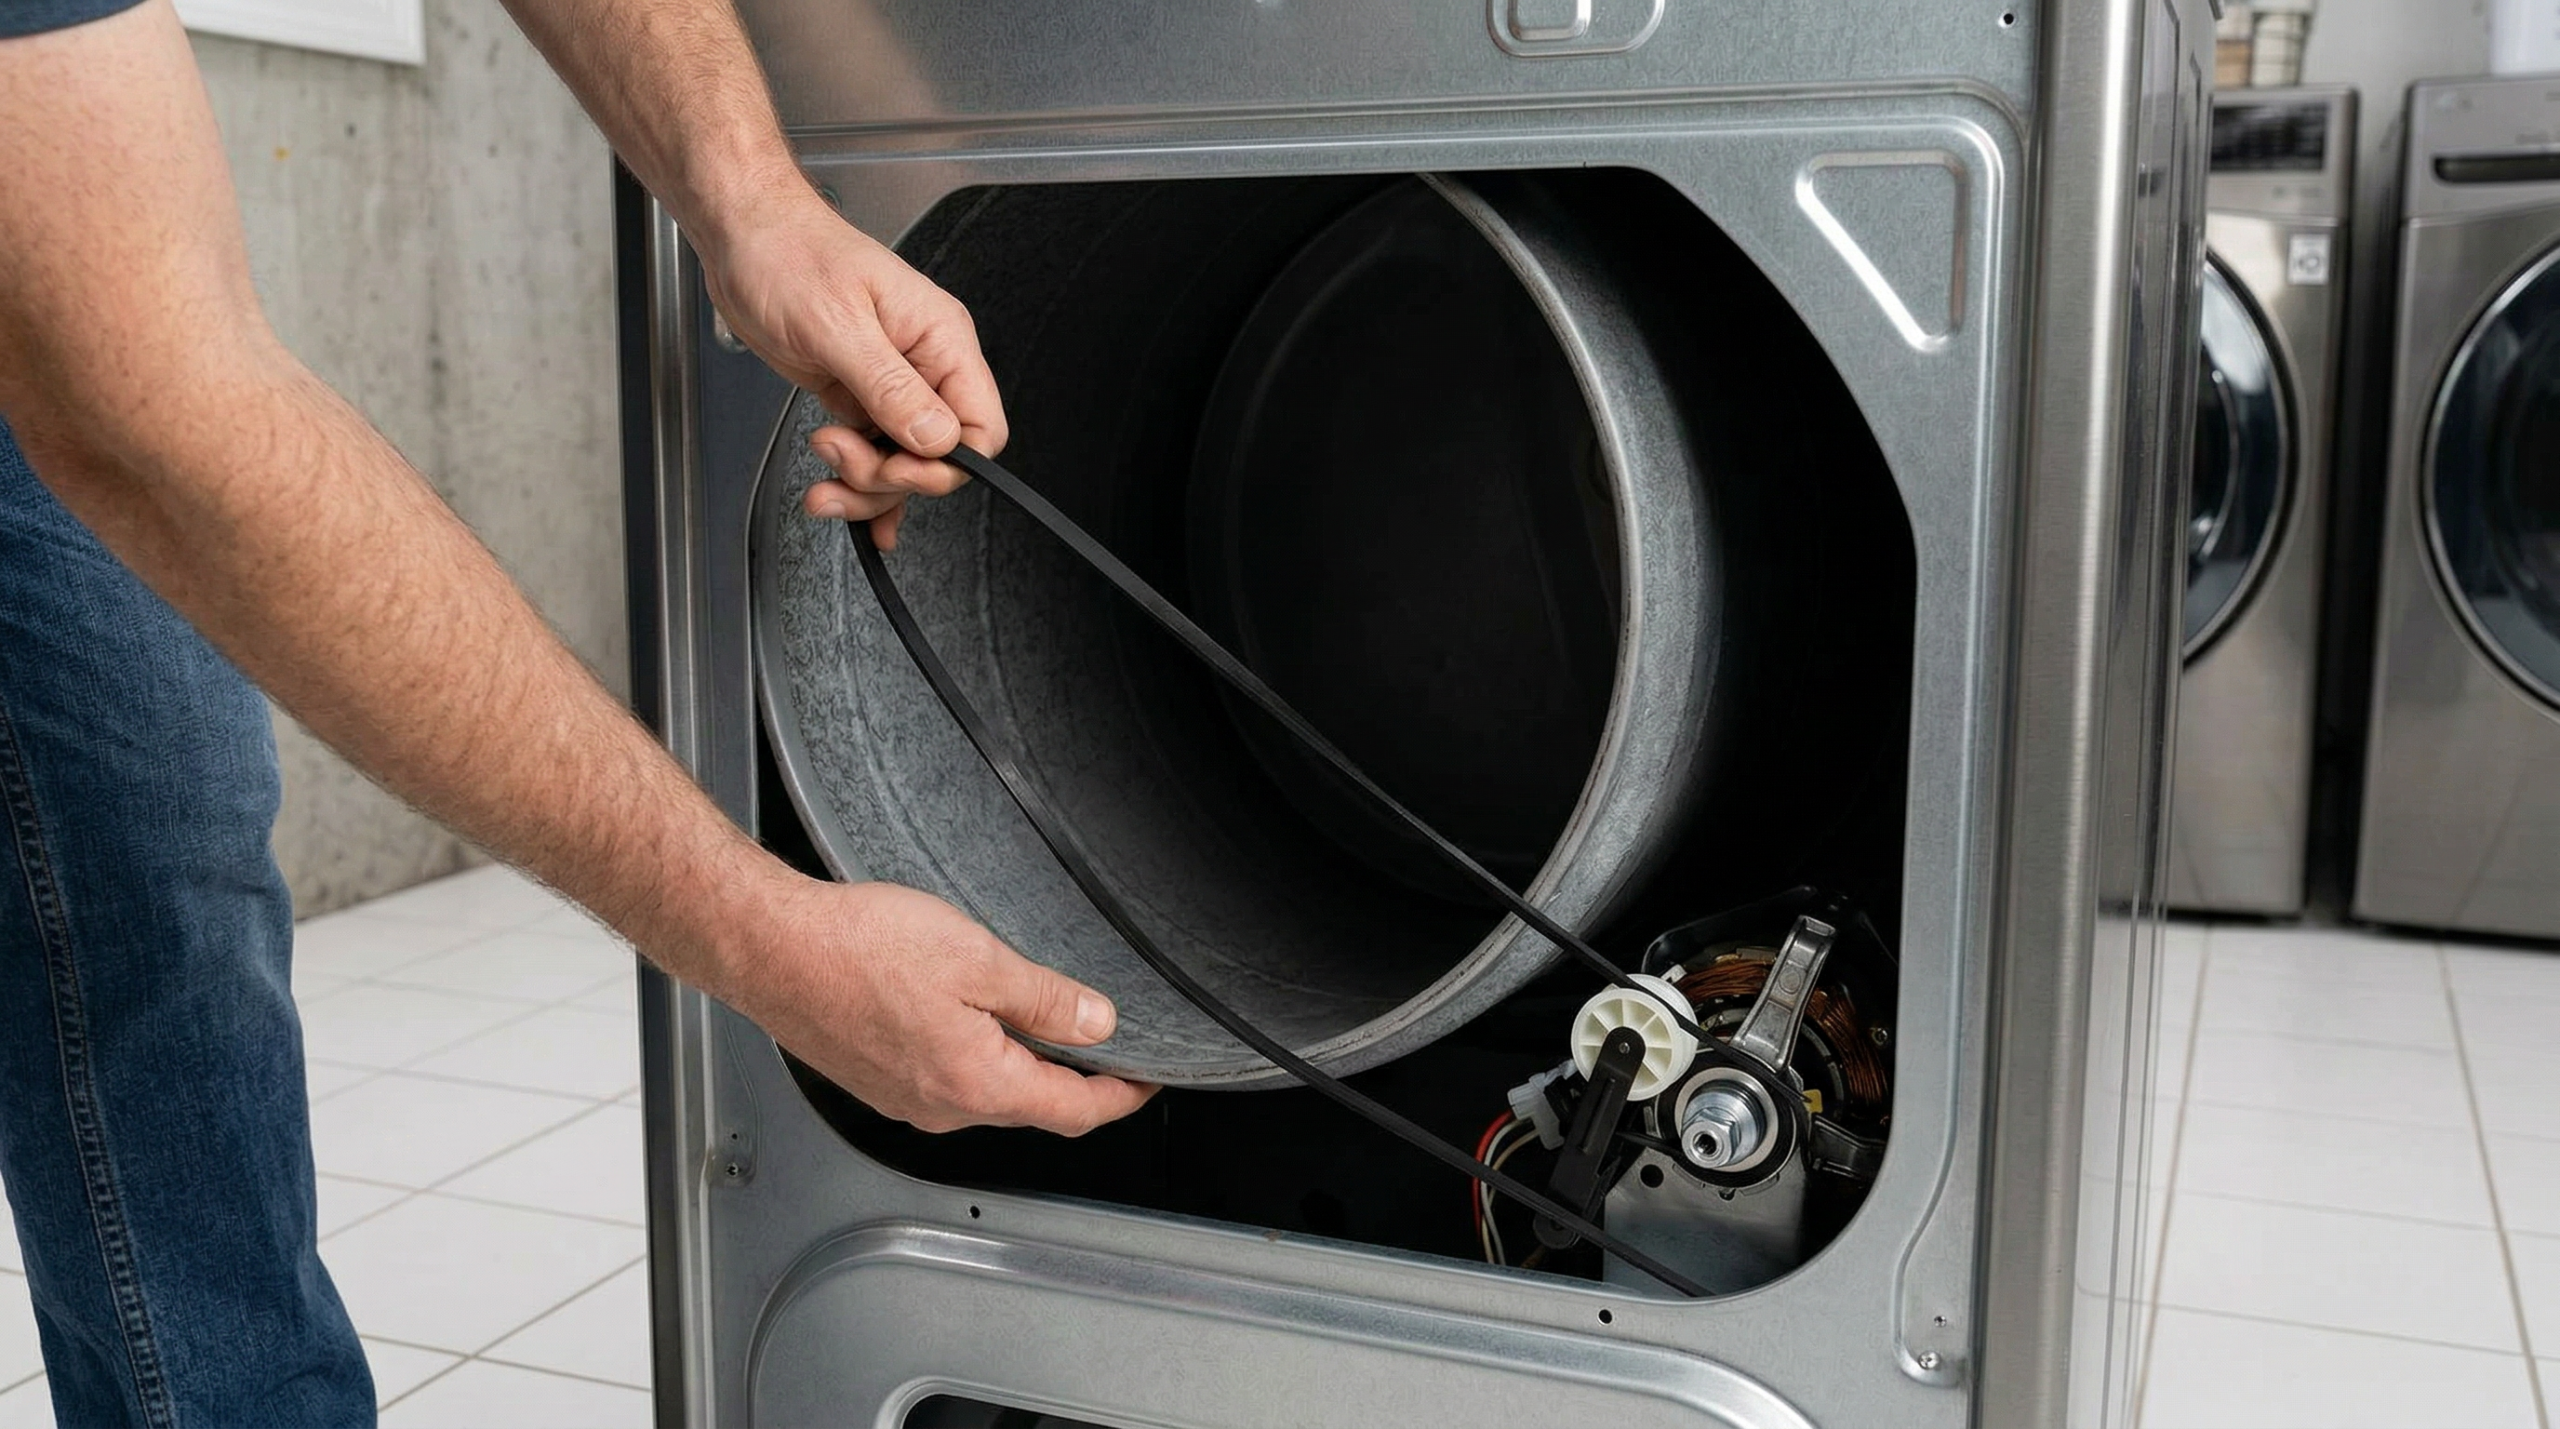
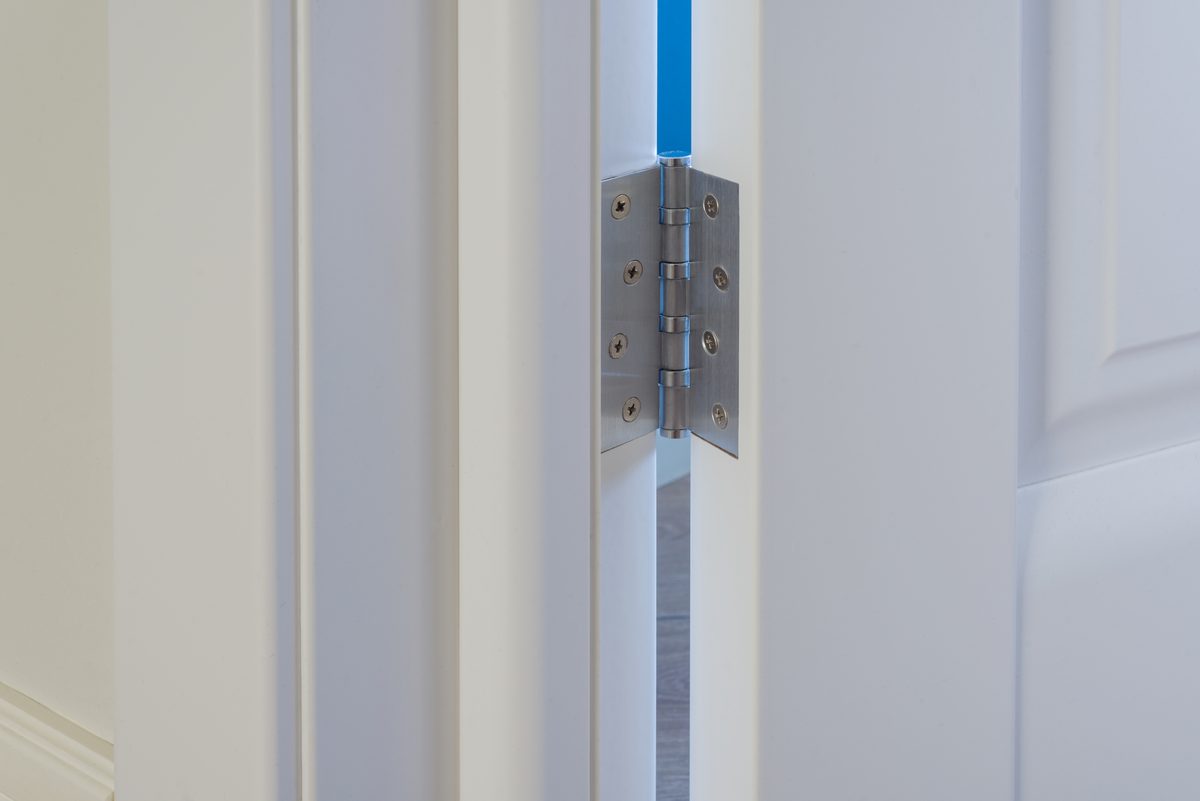
Repair #3: Drum Not Spinning
When the motor hums but the drum stays still, a broken drive belt is almost always the cause. Dryer belt replacement is one of the most satisfying DIY repairs because the symptom is obvious, the diagnosis is simple, and a replacement belt costs $14 to $32. The idler pulley, which maintains belt tension, occasionally fails alongside the belt, so inspect it while the cabinet is open. A worn idler pulley bearing feels rough or wobbly when you spin it by hand, compared to a smooth, frictionless spin on a good pulley.
Difficulty: Moderate | Time: 45-60 minutes | Parts cost: $14-$45
- Unplug the dryer, then remove the top panel and front panel to access the drum. On most residential dryers, the front panel attaches with two screws at the bottom and two clips at the top.
- Lift or slide the drum out of the cabinet. The old belt either lies broken in the bottom of the cabinet or wraps loosely around the drum with no tension.
- Thread the new belt around the drum, ribbed side against the drum surface. Route the belt under the idler pulley, then around the motor pulley, in a Z-pattern or figure-eight depending on your model. Your dryer’s service manual (available free on most manufacturer websites) shows the exact routing.
- Rotate the drum by hand before closing the cabinet. Smooth, consistent resistance means the belt is routed correctly. Any catching or skipping means the belt missed a pulley groove.
- Inspect the idler pulley while you’re in there. If it wobbles more than 1/8 inch or feels gritty, replace it at the same time for another $10-$15. Since the cabinet is already open, the added labor cost is zero.
Dryer drum not spinning problems caused by a worn motor or a seized bearing are less common but more expensive to address. However, a dryer drum not spinning due to a simple broken belt costs under $35 to fix, compared to $150-$250 for a motor replacement. If the motor hums under load but the belt is intact and routed correctly, use a multimeter to check for voltage at the motor terminals. Absent voltage points to a control board issue rather than a mechanical one.
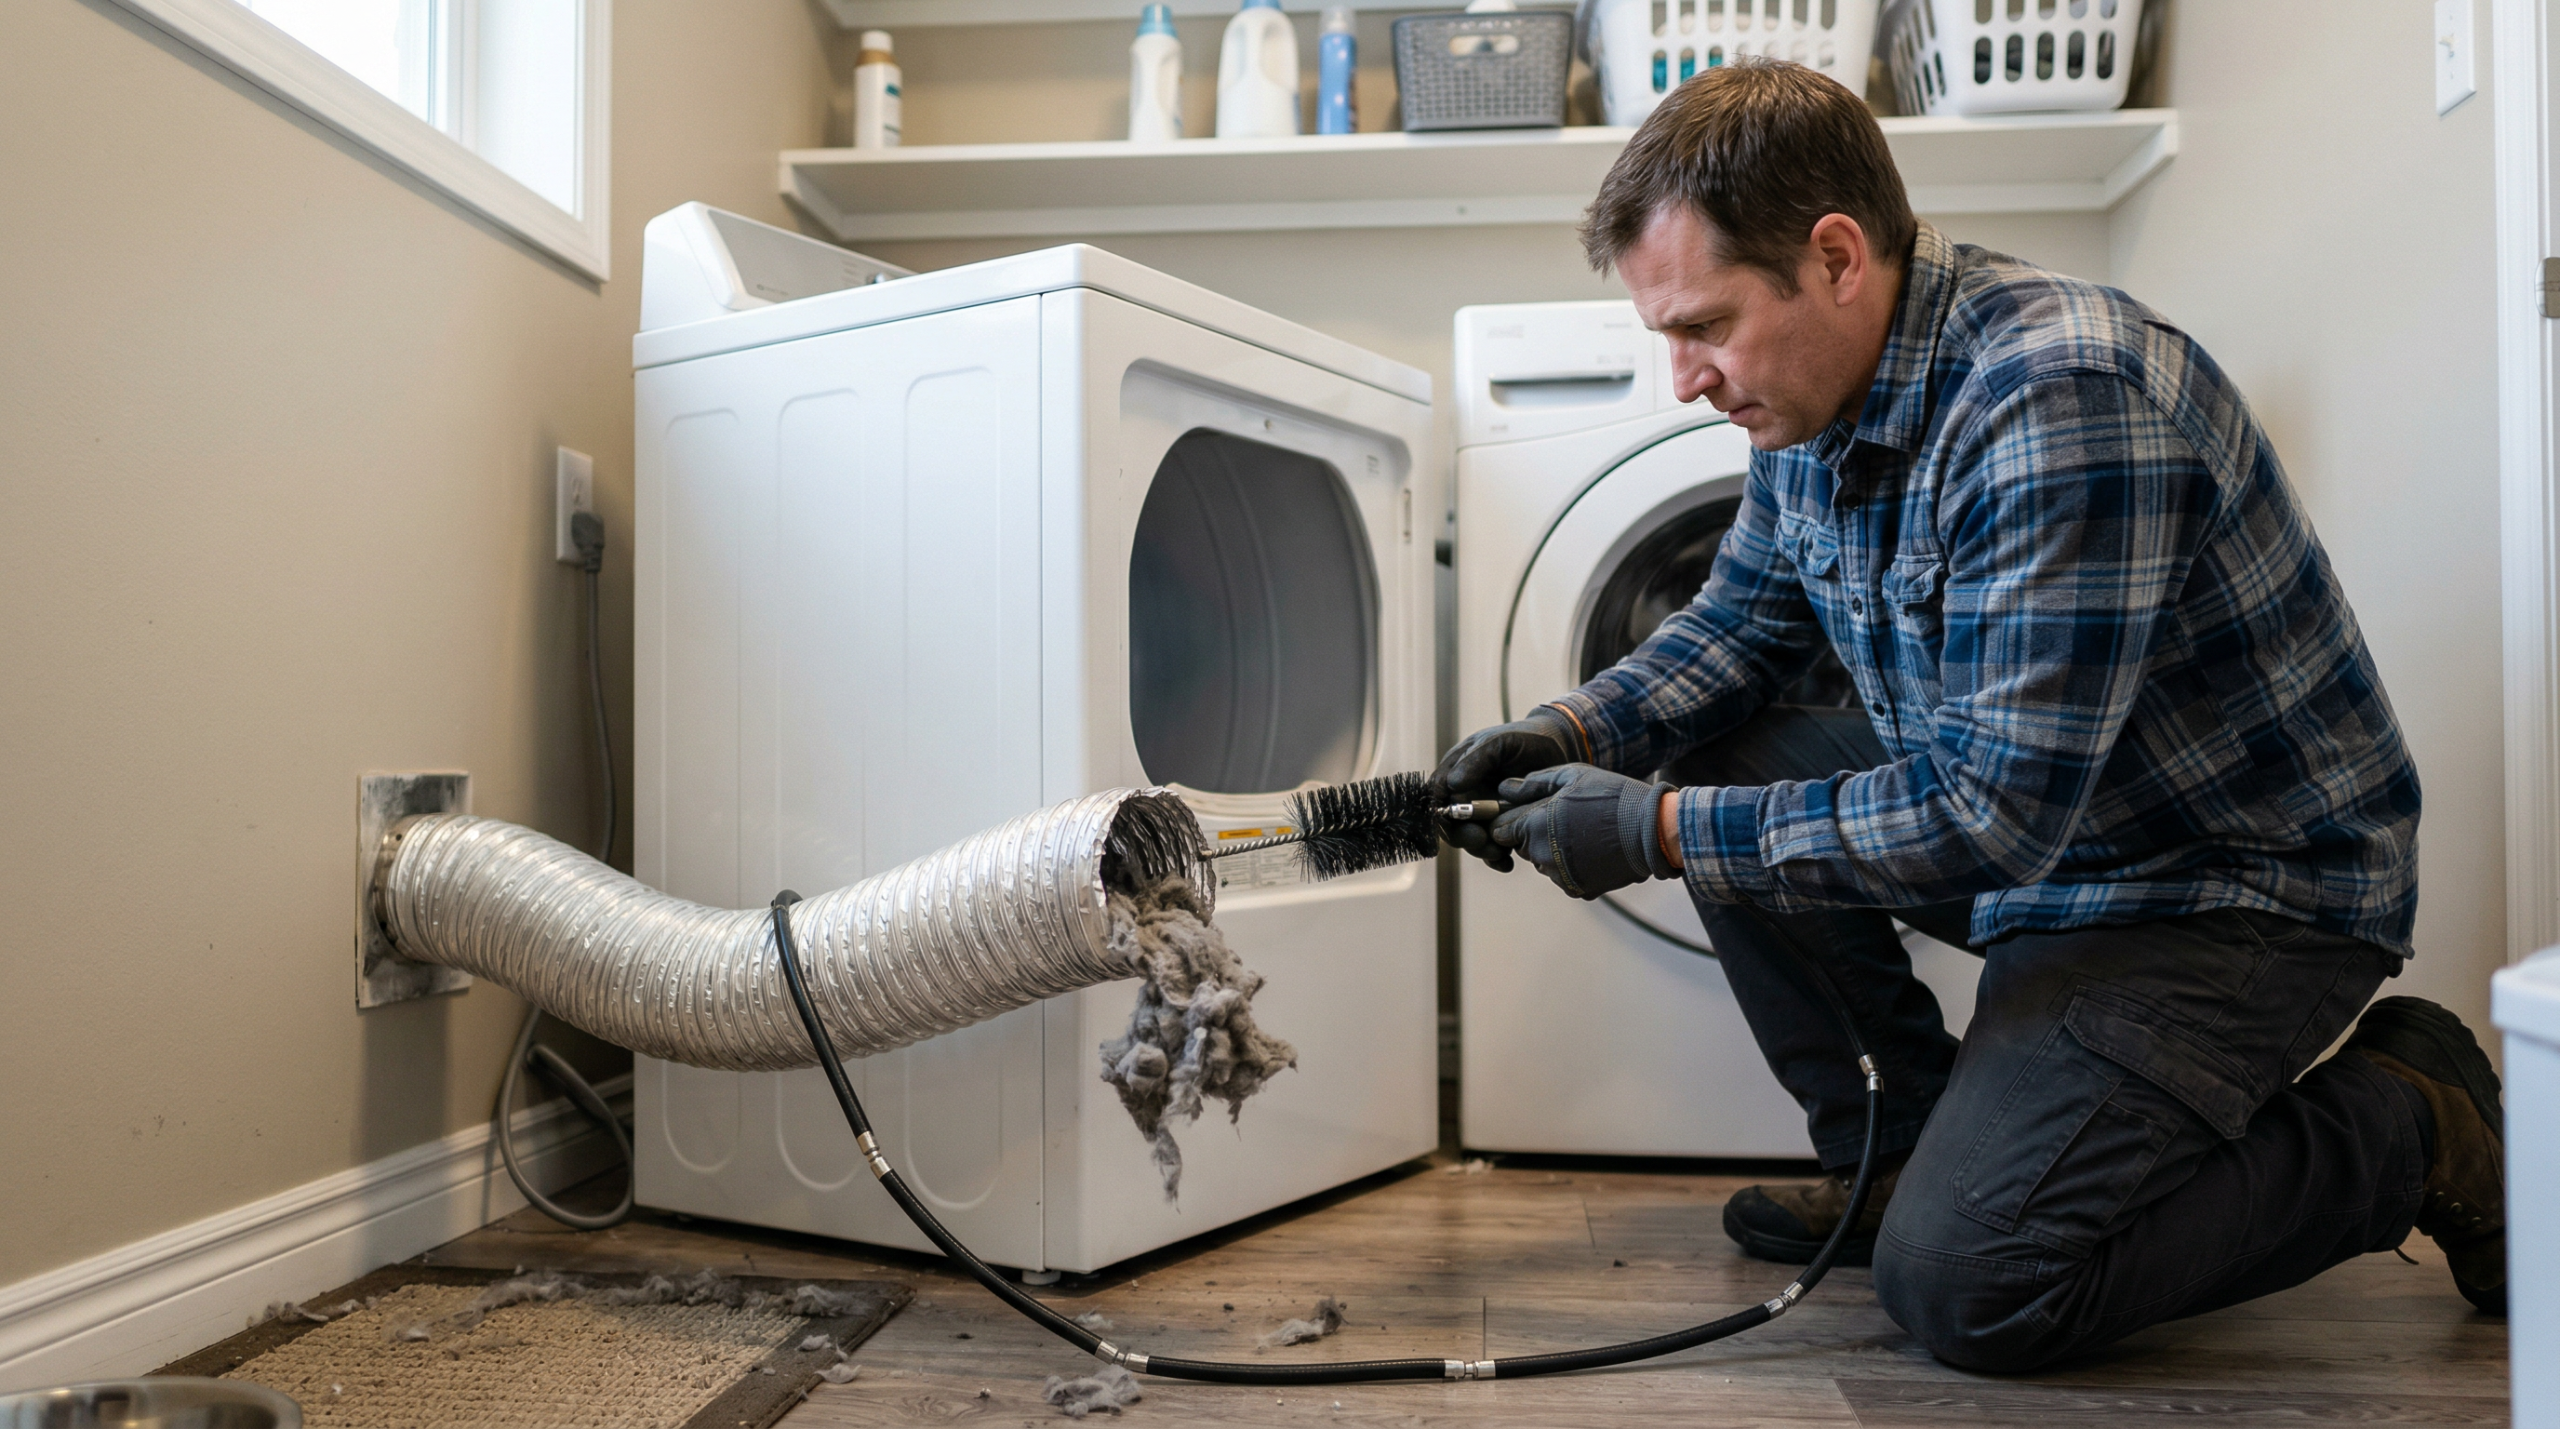
Repair #4: Takes Too Long to Dry
Slow drying is one of the most frequent common dryer repairs, and a dryer taking 60+ minutes for a normal load, when it previously finished in 30-35 minutes, almost always traces to airflow restriction, a dirty moisture sensor, or both. Vent cleaning is the highest-impact action in all of dryer repair, and it’s also the most-neglected maintenance task in the laundry room. The roughly 2,900 annual dryer fires reported to U.S. fire departments tie back to lint buildup in exhaust ducts more than any other single cause.
Difficulty: Easy | Time: 15-30 minutes | Parts cost: $0-$30
- Disconnect the dryer from the exhaust duct and use a dryer vent cleaning brush (a rotary kit costs about $25) to clear the duct run. Also vacuum the interior duct collar on the dryer itself.
- Check the exterior vent cap for blockage, including bird nests and crushed sections if the duct runs through an exterior wall. Crushed flex duct reduces airflow by more than 50% even when otherwise clean.
- While the back is accessible, locate the two moisture sensor bars inside the drum: they’re parallel metal strips, roughly 1.5 inches long, positioned below the drum opening. Wipe each bar with a cloth dampened with rubbing alcohol.
- Dryer sheets leave a waxy film on moisture sensors over time, causing the sensor to read clothes as dry before they are, then ending the cycle early. Alternatively, a coated sensor reads wet when clothes are already dry, forcing extended run times. This 2-minute cleaning step fixes both problems at no cost.
Long drying times also appear in the spring home maintenance checklist as a seasonal task worth scheduling. Vent cleaning once or twice per year keeps both drying performance and fire risk in check.
Repair #5: Dryer Making Noise
Among common dryer repairs, noisy dryers fall into three diagnostic categories, and the sound type points directly to the bad part. A high-pitched squeal indicates worn drum glides or a dry idler pulley bearing. Rhythmic thumping every 2-3 seconds means a drum roller has developed a flat spot. Grinding or metal-on-metal sound means a roller has deteriorated far enough to expose its metal shaft against the drum support housing. Drum rollers cost $20-$55 for a set of four, and replacing all of them at once makes sense because they wear at similar rates.
Difficulty: Moderate | Time: 45-75 minutes | Parts cost: $20-$60
- Remove the top and front panels and lift out the drum as described in Repair #3. The drum rollers mount on the rear bulkhead (two rollers) and occasionally on the front bulkhead as well.
- Spin each roller by hand. Smooth, quiet rotation means the roller is fine. Rough or squeaking rotation means replacement is needed. Also press on the roller axle; more than 1/16-inch of wobble means the bearing is worn.
- Slide the old rollers off their shafts. On some models, a small C-clip or trivet retainer holds the roller in place; needle-nose pliers remove it in seconds.
- Press the new rollers onto the shafts. They should seat with firm, even resistance and rotate freely once installed.
- Before reinstalling the drum, rotate each new roller by hand. It should spin freely and silently with no wobble. If any roller catches or squeaks, remove it and check whether it fully seated on the axle.
- While the drum is out, check the drum glides (the plastic slides around the front drum rim). Worn glides show scoring or missing material, compared to new glides, which are smooth and intact. Replacement glide kits cost $15-$25.
Repair #6: Dryer Overheating
A dryer burning clothes, scorching, or shutting off mid-cycle from heat has three likely causes: a blocked exhaust vent, a failed cycling thermostat, or a deteriorated drum felt seal. The cycling thermostat opens and closes to regulate drum temperature during normal operation. Unlike the thermal fuse, the cycling thermostat is a reusable component, not a one-time safety device. A cycling thermostat failing in the closed position causes the heating element to run continuously, which pushes temperatures past safe limits within minutes.
Difficulty: Easy to Moderate | Time: 20-50 minutes | Parts cost: $10-$35
- First, confirm the exhaust vent is clear using the steps in Repair #4. A blocked vent causes overheating before any thermostat fails, so clearing it first avoids an unnecessary part purchase.
- If the vent is clear, locate the cycling thermostat on the exhaust duct or blower housing. It looks similar to the thermal fuse but is slightly larger and has two or four terminals depending on the model.
- Disconnect the wires and test continuity at room temperature. A functioning cycling thermostat reads continuity when cold. If it reads open, it has failed in the open position and the dryer won’t heat. Stuck closed means the dryer overheats.
- Cycling thermostats cost $10-$25 and swap out in under 10 minutes once the back panel is off.
- Also inspect the drum felt seal around the front and rear drum openings. A torn or missing seal allows hot air to recirculate inside the cabinet rather than exhaust through the vent, concentrating heat. Felt seal kits cost $15-$25 and attach with high-temperature adhesive.
Repair #7: Gas Dryer Won’t Ignite
Gas dryers and electric dryers share most components, with one major exception: the heating system. Where an electric dryer uses a resistance heating element, a gas dryer uses a burner assembly with an igniter and a set of gas valve solenoid coils. When a gas dryer tumbles but produces no heat, the igniter or the gas valve coils are responsible in the vast majority of cases. The igniter glows orange-hot to light the gas; the valve coils open the gas valve when the igniter reaches ignition temperature.
Difficulty: Moderate | Time: 30-60 minutes | Parts cost: $20-$65
- Close the gas shutoff valve, then unplug the dryer. Remove the front panel and lower kickplate to access the burner assembly at the bottom of the cabinet.
- Before this step, keep your face and body well away from the burner assembly. With the gas valve still closed, restore power and run a short test cycle while observing from a safe distance. If the igniter glows orange but no flame ignites once you open the gas valve, the gas valve coils are likely the issue. Should the igniter never glow at all, the igniter itself has failed. Do not reach into the cabinet while the dryer is running.
- To test the igniter, disconnect its wires and measure resistance with a multimeter. A working igniter reads 50-400 ohms depending on the model. An open reading (infinite ohms) confirms a broken igniter. Igniters cost $25-$45.
- Gas valve coil kits typically include 2-3 coils and cost $20-$35. Each coil unscrews from the valve body and unplugs from the wiring connector. Install the new coils in the same positions as the originals.
- After reassembly, apply soapy water to the gas valve connections and check for bubbles before running. Then open the gas valve, restore power, and run a short test cycle. Listen for the igniter click and watch for a consistent flame at the burner. Do not tighten or adjust any gas flex connector fittings yourself.
Note: gas line connections fall outside the scope of the repairs in this guide. If you smell gas after reopening the supply valve, shut it again immediately and call your gas utility.
Repair #8: Moisture Sensor Not Working
The moisture sensor is the most overlooked component in the full range of common dryer repairs, and cleaning it costs nothing. Two metal bars inside the drum measure electrical resistance between wet and dry fabric. Over time, dryer sheet residue builds up on those bars and distorts the readings, causing the dryer to end cycles early (clothes still damp) or run for too long (clothes fully dry but the dryer doesn’t know it). I’ve seen homeowners replace perfectly good components while the actual problem was a 30-second cleaning job.
Difficulty: Minimal effort | Time: 2-15 minutes | Parts cost: $0-$25
Cleaning the Sensor (Free Fix)
- Open the dryer door and locate the two metal sensor bars on the front bulkhead, below the drum opening. They’re parallel strips, silver or chrome-colored, roughly 1.5 inches long.
- Dampen a cloth with rubbing alcohol (isopropyl, 70% or higher). Wipe each bar firmly to remove the waxy buildup. Two passes per bar is usually sufficient.
- Run a test cycle with a small damp load. If the dryer now stops at the appropriate moisture level, the sensor coating was the issue all along.
Testing the Sensor with a Multimeter
- If cleaning doesn’t resolve the problem, disconnect the sensor wires and test resistance between the terminals. Moisture sensors should read a high resistance (megaohms range) when dry and lower resistance when touched with a damp finger.
- An open or shorted sensor reads incorrectly in both conditions. Replacement sensors cost $15-$25 and mount with two screws.
Repair or Replace: Common Dryer Repairs Decision Framework
The standard appliance repair guideline says to replace when the repair cost exceeds 50% of a new unit’s price. For a dryer, the average mid-range replacement costs $800-$1,200 new, which puts the repair threshold at $400-$600. Most common dryer repairs in this guide fall well below $100 in parts, so the decision is straightforward for newer units. However, as the dryer ages past 8 years, the math around common dryer repairs shifts toward replacement, and age changes the math significantly. If replacement makes more sense, the Samsung washer and dryer lineup for 2026 covers what to look for in a modern laundry pair.
| Dryer Age | Repair Cost Under $100 | Repair Cost $100-$300 | Repair Cost Over $300 |
|---|---|---|---|
| Under 5 years | Always repair | Repair | Evaluate; check warranty |
| 5-8 years | Repair | Repair if single failure | Consider replacing |
| 8-13 years | Repair | Evaluate carefully | Replace |
| Over 13 years | Repair only if cosmetically sound | Replace | Replace |
Also consider failure frequency. A dryer needing two repairs in 18 months sends a clear signal about its overall condition. Similarly, if drum rollers, a belt, and a heating element all fail within a short window, the wiring connections and control board are likely next. Consequently, chasing each failure individually adds up fast. At some point, investing $800+ in a new Energy Star unit using 20% less electricity per cycle makes more financial sense than chasing individual failures on an aging machine.
Pros and Cons of DIY Dryer Repair
Pros
- Parts cost $5-$55 versus $180+ for a technician visit
- Most repairs take under 60 minutes with basic hand tools
- Thermal fuse, belt, and roller parts are available same-day at hardware stores or next-day online
- Improves fire safety by addressing vent blockage and overheating conditions directly
- Builds diagnostic knowledge applicable to other appliances
- No wait time for a repair appointment; fix it on your schedule
Cons
- 240V electric dryers require strict unplugging discipline; mishandling is lethal
- Gas dryer repairs carry added risk if you disturb gas line connections
- Control board failures cost $150-$350 and are not worth DIY diagnosis time on older units
- Model-specific part numbers require research before ordering; incorrect parts waste time and money
- Some European front-loader designs require significant disassembly to reach basic components
Final Verdict
The eight common dryer repairs in this guide represent the full range of failures most homeowners encounter over a dryer’s 10-13 year lifespan. Each repair is achievable in under 90 minutes with parts costing $5-$55, compared to a $180+ service call requiring you to wait for an appointment. Dryer troubleshooting follows a predictable pattern: check the cheapest component first, confirm the diagnosis with a multimeter before buying parts, and clean the exhaust vent before calling any repair complete.
The two repairs with the highest return on effort are the thermal fuse replacement (fixes the #1 symptom for $8 in 20 minutes) and the moisture sensor cleaning (free, 2 minutes, widely overlooked). Together, those two address roughly 40% of the calls a technician gets about dryers performing poorly.
Outside these common dryer repairs, call a technician for motor replacements, control board failures, and any repair involving gas line connections beyond the shutoff valve. Also call a pro if the dryer is over 13 years old and facing a second major repair, because at the 13-year mark the replacement arithmetic wins. For everything else on this list of common dryer repairs, the parts are cheap, the steps are logical, and the savings are real.
Frequently Asked Questions
Why is my dryer not heating up?
The most common cause when a dryer stops heating is a blown thermal fuse, which costs $5-$18 to replace. Specifically, the thermal fuse is a one-time safety device on the exhaust duct; it burns out when the dryer overheats, usually because the vent is clogged. Test it with a multimeter set to continuity; no continuity confirms the fuse is blown. After replacing the fuse, clean the exhaust duct thoroughly, because leaving the blockage in place blows the new fuse within a few cycles.
How do you replace a dryer belt yourself?
Dryer belt replacement starts with removing the top and front panels to expose the drum, and the repair is well within reach of any homeowner. Lift out the drum, then route the new belt around the drum (ribbed side inward), under the idler pulley, and around the motor pulley in the pattern shown in your model’s service manual. Rotate the drum by hand before closing the cabinet to confirm smooth, consistent tension. The full job takes 45-60 minutes, and a replacement belt costs $14-$32 depending on the brand.
How much does dryer repair cost?
A technician charges $150-$200 for the service call alone, before parts. In contrast, DIY repairs for the same problems cost $5-$55 in parts for the vast majority of failures. Thermal fuses run $5-$18, belts run $14-$32, and heating elements run $20-$50. The only dryer repairs where professional labor makes more economic sense are control board replacements and motor failures, both of which involve $150-$400 in parts alone.
Why does my dryer take so long to dry clothes?
A restricted exhaust vent is responsible for slow drying in most cases. Lint accumulation in the duct reduces airflow, which extends cycle times from a normal 30-35 minutes to 60 minutes or more. The second most common cause is a moisture sensor coated with dryer sheet residue, which throws off the sensor’s readings and causes erratic cycle lengths. Clean the vent duct and wipe the moisture sensor bars with rubbing alcohol before doing anything else.
How do I know if my dryer heating element is bad?
Test the heating element with a multimeter set to resistance. Disconnect both terminal wires and probe each terminal. A working element reads 8-15 ohms; an open reading (infinite ohms or “OL” on a digital meter) means the element is burned out and needs replacement. Also visually inspect the element coil for breaks or burnt spots, which confirm failure without needing a meter. Heating elements cost $20-$50 and take about 30-45 minutes to replace.
Is it worth repairing a dryer or should I replace it?
Repair makes sense when the parts cost falls well below 50% of a replacement unit’s price and the dryer is under 8 years old. For a $600-$900 dryer, repairs under $100 in parts are almost always worth doing. Above 8 years old with a repair cost over $200, replacing with a new Energy Star model starts making more financial sense, especially since newer units use 20% less electricity per cycle. A second major repair on the same unit within 18 months is a strong signal to replace rather than repair again.

Leave a Reply