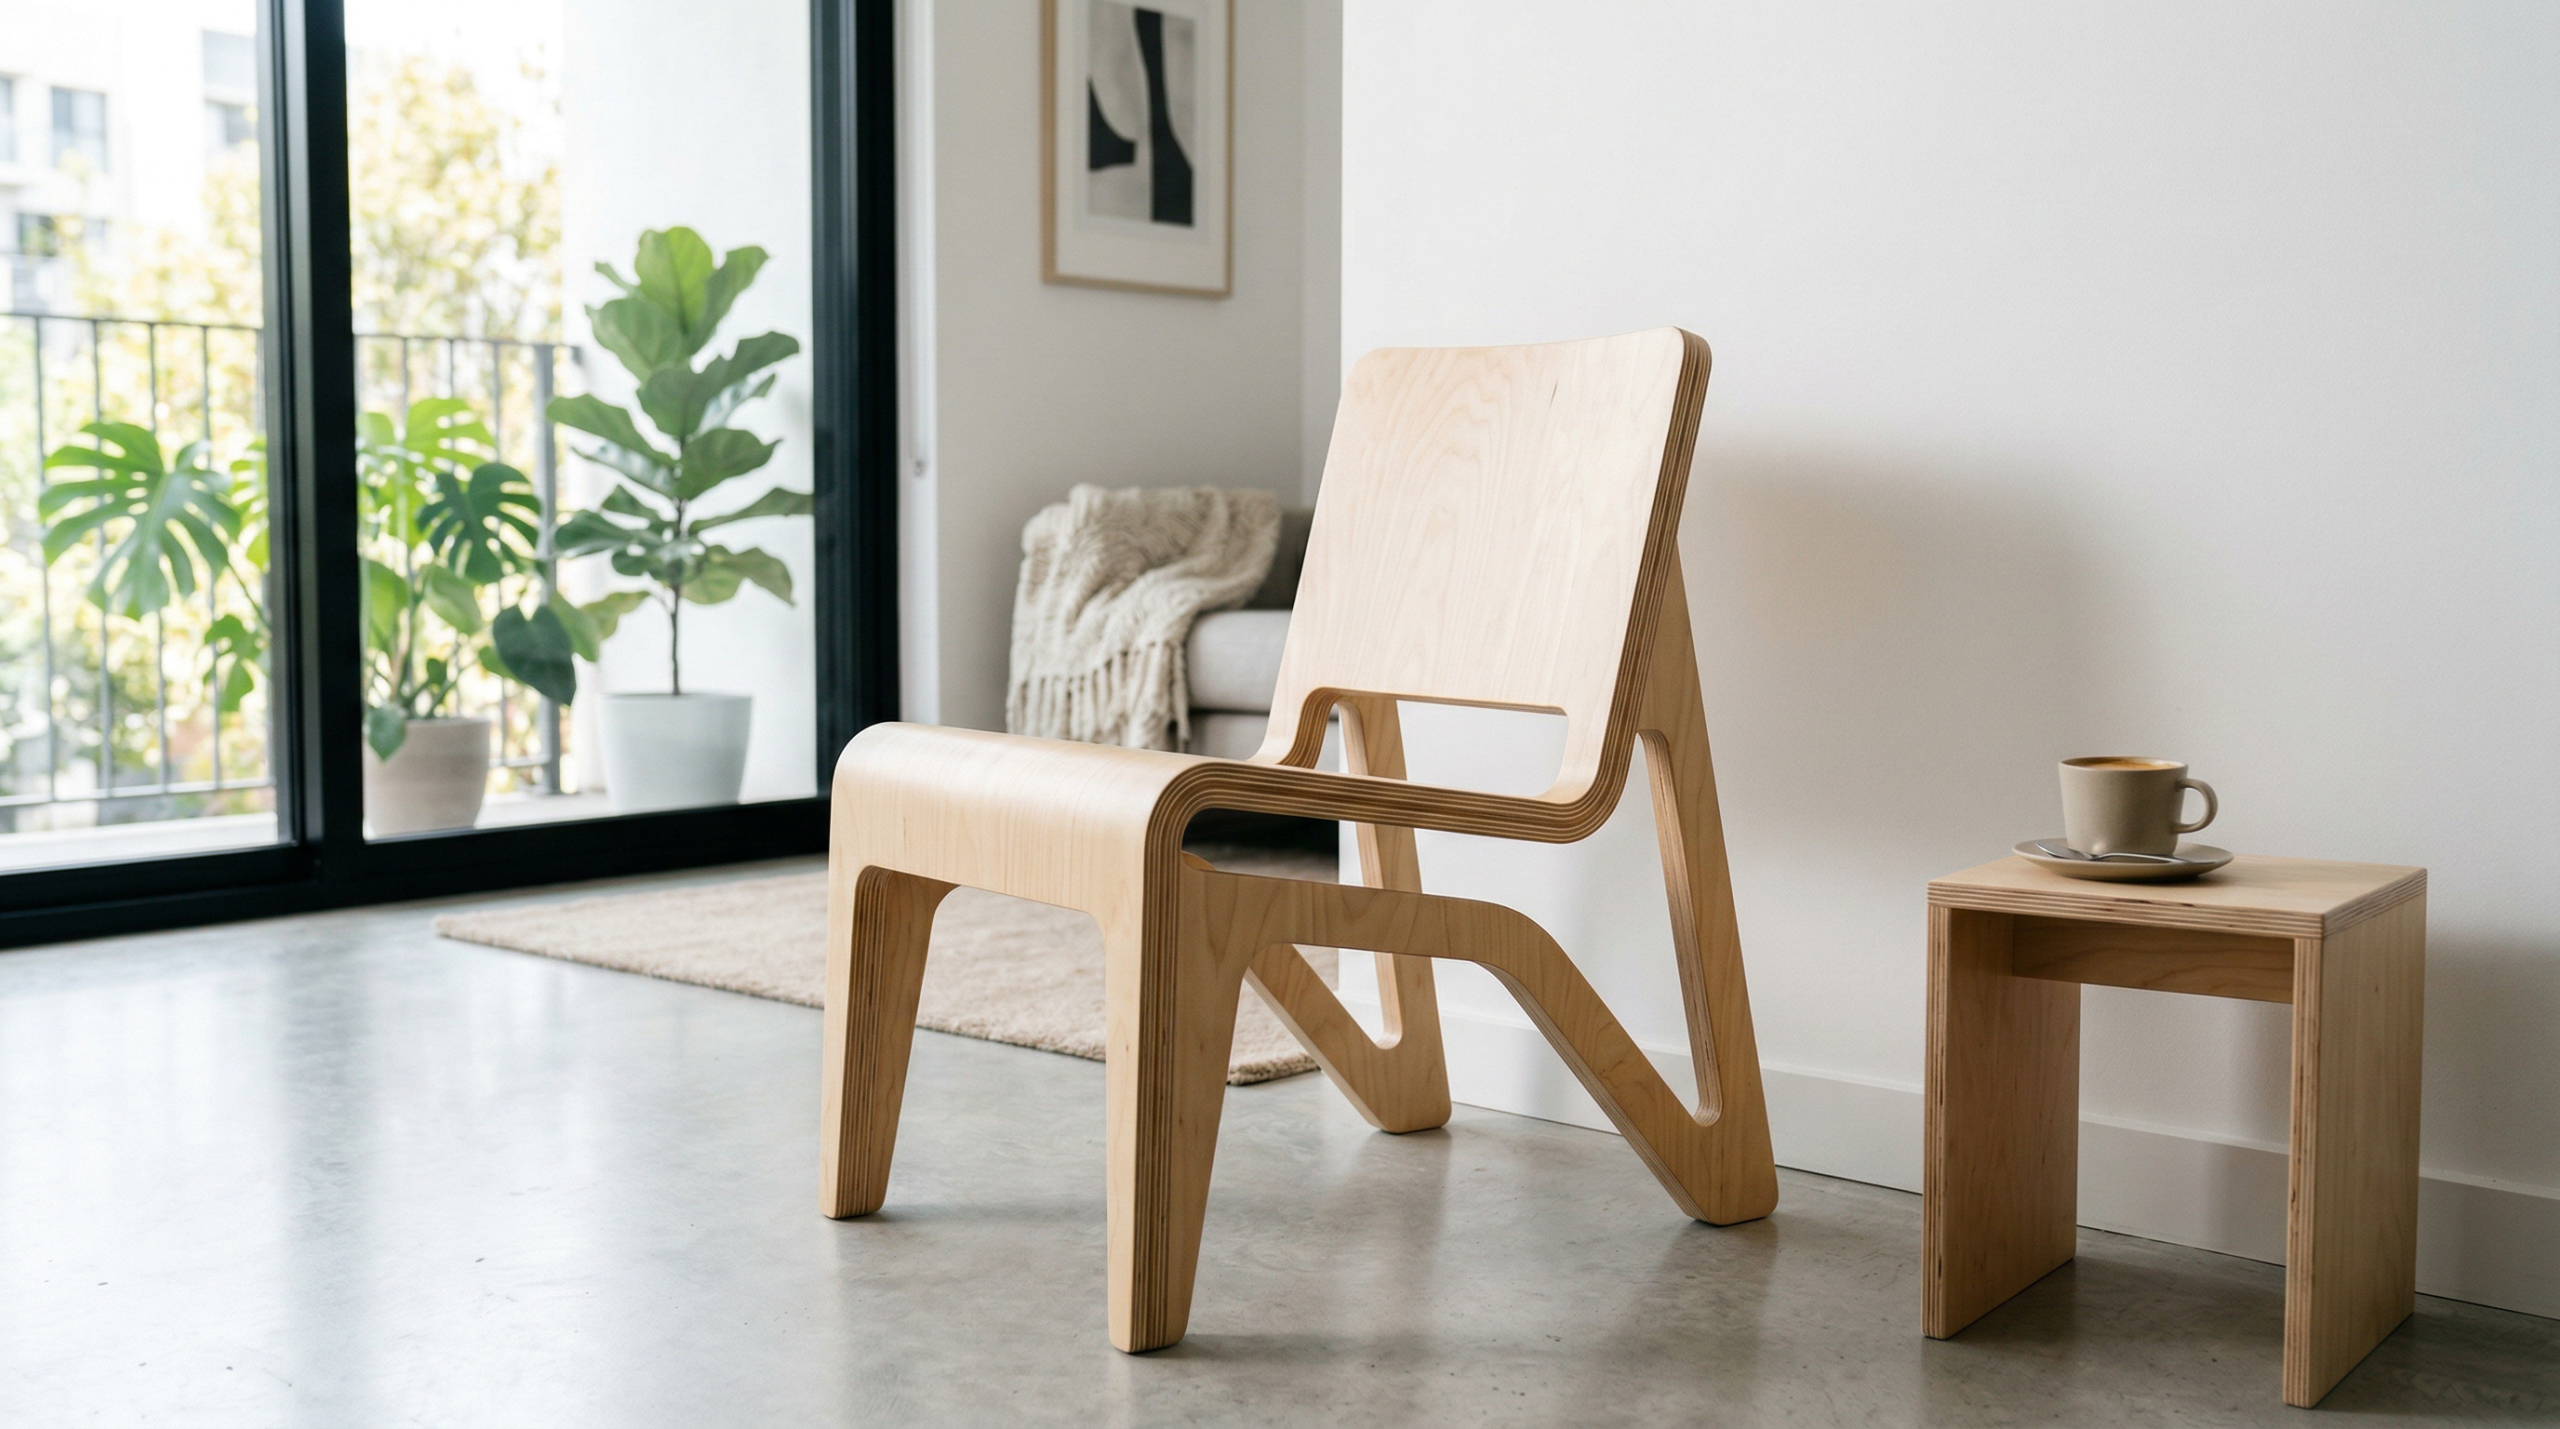
One 4×8 sheet of 3/4-inch plywood costs between $35 and $50 at any home center, and it gives you everything you need to build a complete, sturdy chair. No extra lumber, no specialty hardware, no prior woodworking experience required. This DIY plywood chair guide covers the full cut list, step-by-step assembly, and finishing options so you walk away with a functional piece of furniture, not a pile of scrap wood.
Table of Contents
- Why Build from a Single Sheet of Plywood
- Materials and Tools
- The Cut List
- Cutting the Pieces
- Assembly Step by Step
- Finishing Options
- Tips for a Stronger Build
- Frequently Asked Questions
Why Build from a Single Sheet of Plywood
A single-sheet approach keeps material costs predictable and waste nearly zero. Because all parts come from one 4×8 panel, you plan your cuts before you buy, confirm everything fits, and leave the lumber yard with exactly what you need. The total project cost lands between $35 and $60 when you factor in glue, screws, and sandpaper.
Plywood chairs are also significantly stronger than most people expect. A sheet of 3/4-inch Baltic birch plywood holds roughly 50 pounds per square foot before any structural reinforcement. A finished chair with glued-and-screwed joints handles 250-plus pounds of seated load without issue. The layered grain construction resists splitting along a single grain line, which is a common failure point in solid-wood furniture.
For beginners, the single-sheet constraint is a genuine design advantage. The dimensions are already optimized to fit an 48-by-96-inch panel, so there are no decisions about lumber dimensions or species. You focus on cutting accurately and assembling cleanly. Start-to-finish build time for a first-timer is 4 to 6 hours.
Materials and Tools
The core material is one 4×8 sheet of 3/4-inch plywood. Baltic birch is the best choice because its voids-free inner plies take screws cleanly and sand to a smooth surface. Standard construction plywood works at a lower price point, however the face veneers are thinner and show more grain irregularities under stain. Avoid OSB entirely; it does not hold fasteners reliably in edge applications.
For fasteners and adhesives, gather the following:
- 1-1/4-inch coarse-thread wood screws (box of 100)
- 2-inch coarse-thread wood screws (box of 50)
- Wood glue (standard PVA, such as Titebond II)
- 120-grit and 220-grit sandpaper
- Wood filler or spackle for screw holes
Tools required for the build:
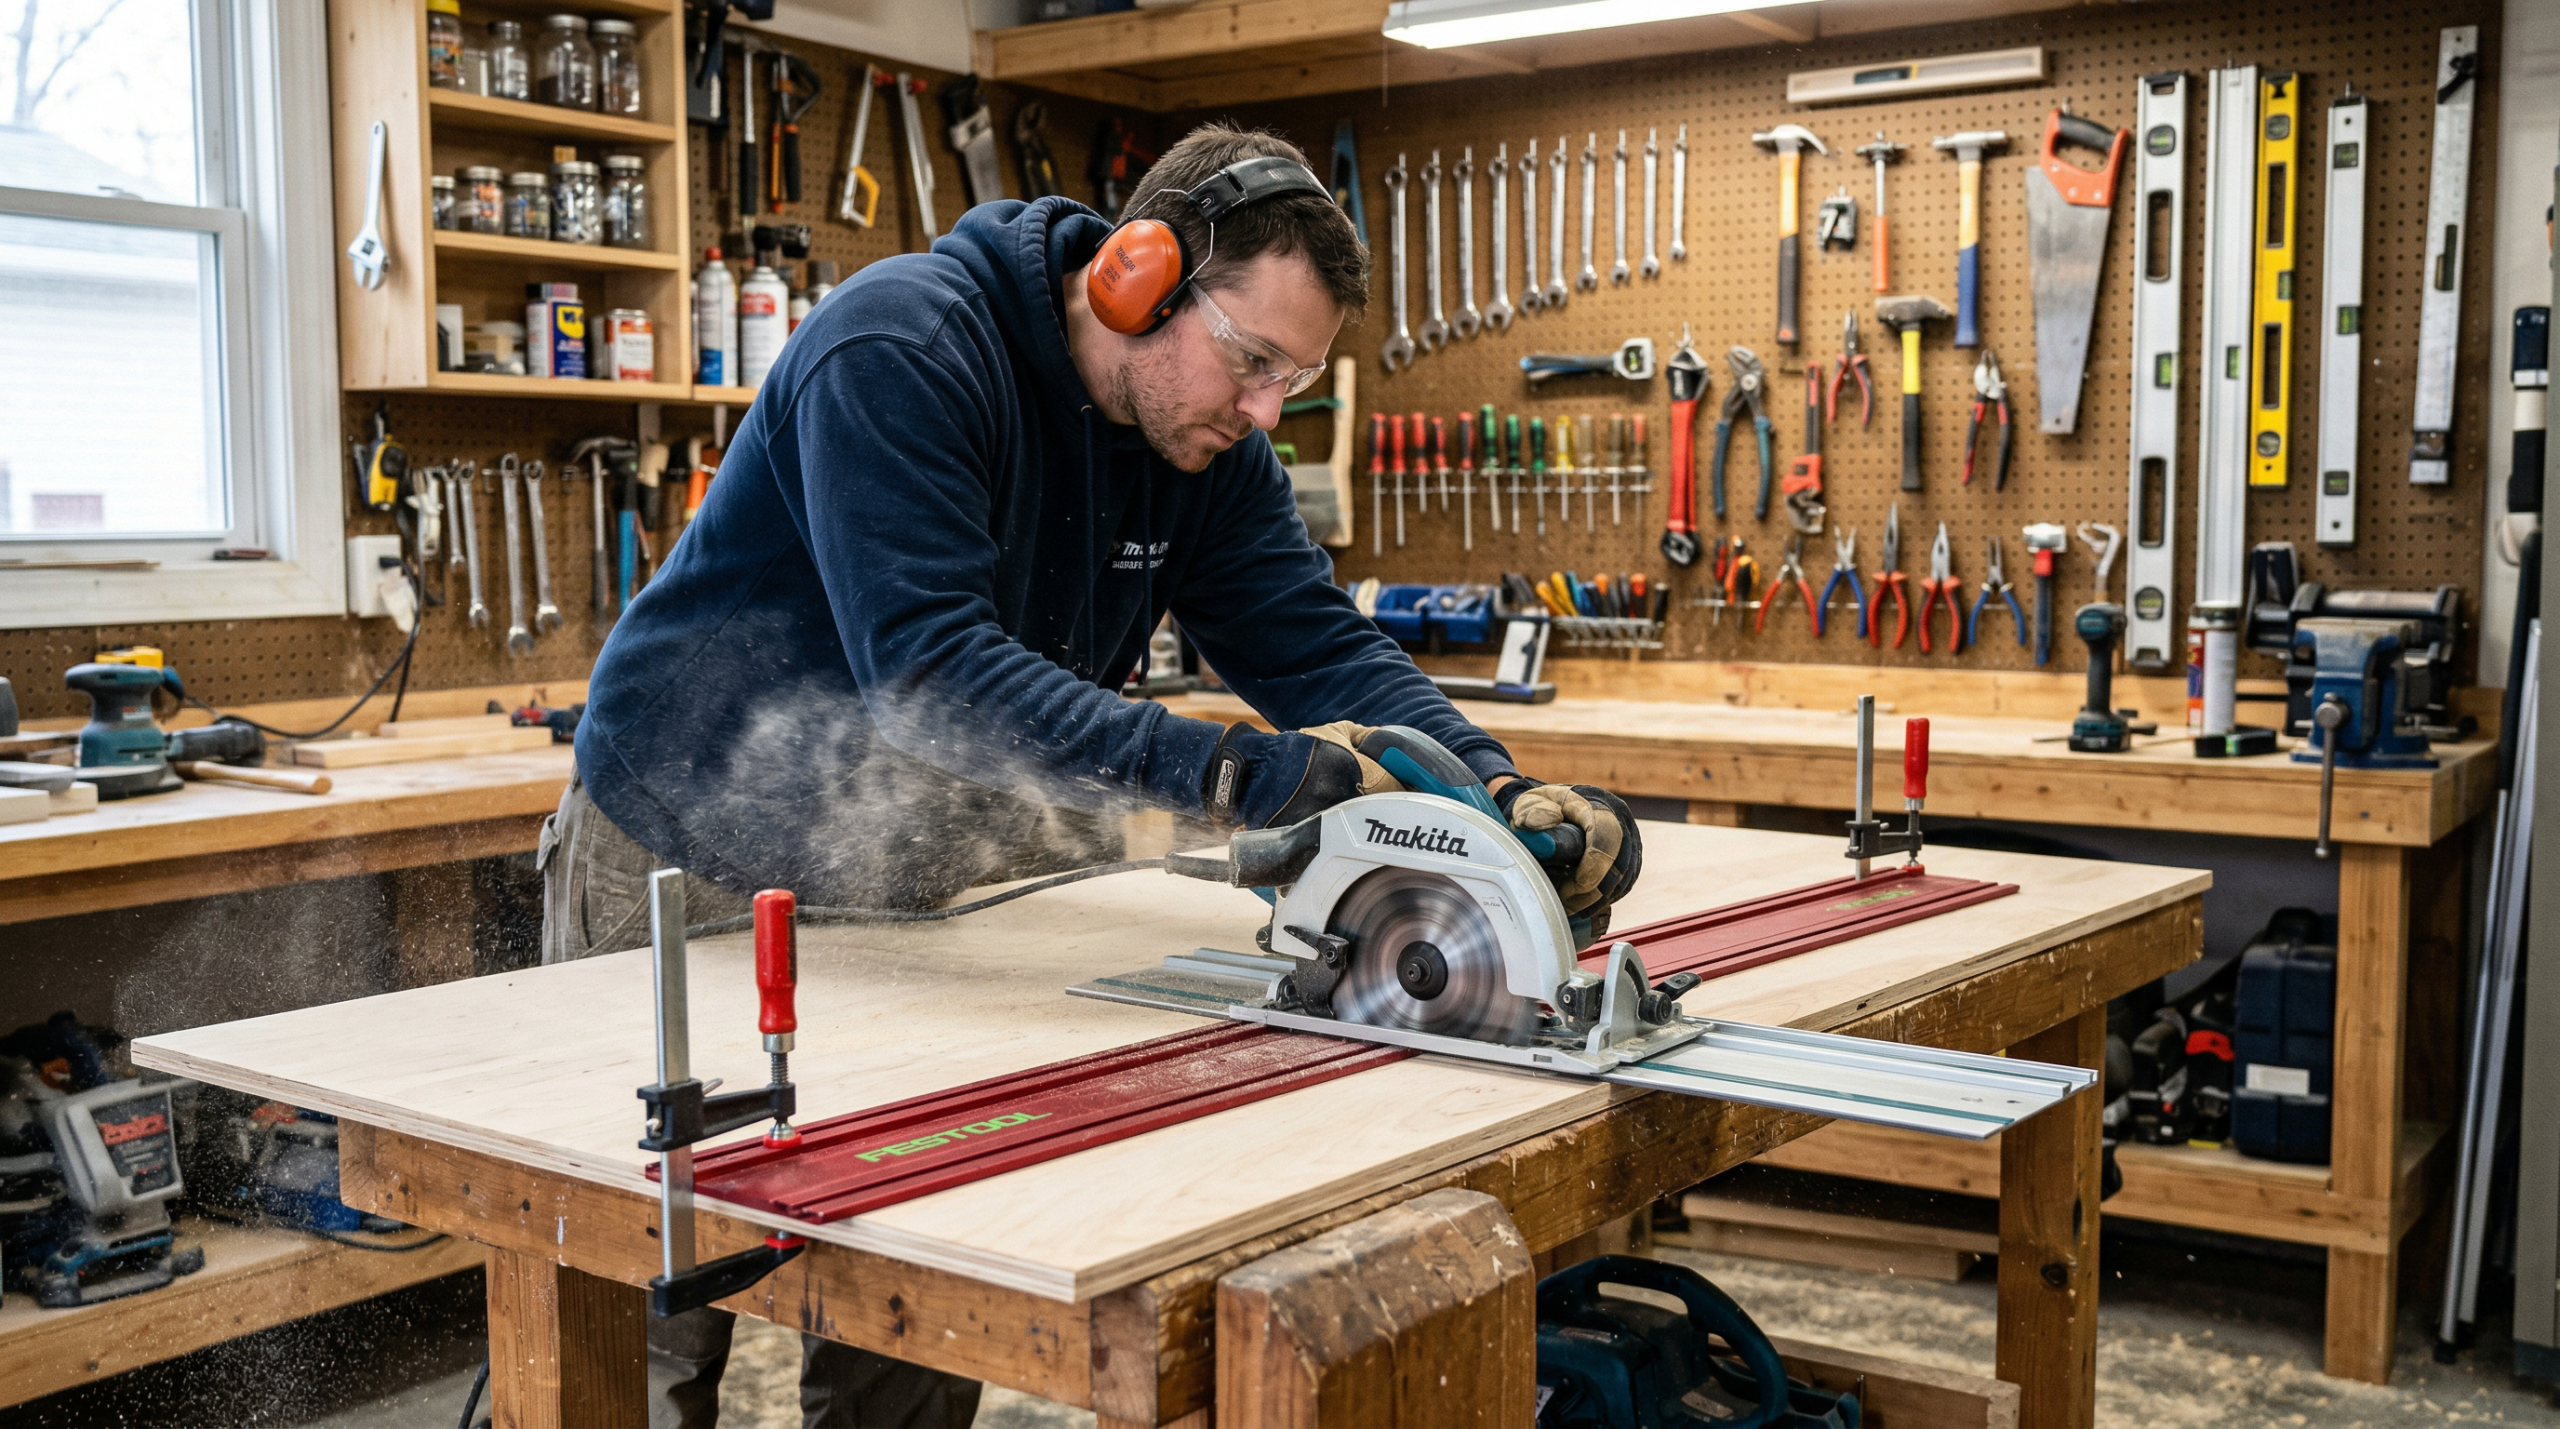
- Circular saw with a 40-tooth blade (for straight cuts)
- Jigsaw (for seat contour and back curves)
- Drill/driver with #2 Phillips bit
- Countersink drill bit (3/8-inch)
- Clamps, minimum 4 (bar clamps or pipe clamps preferred)
- Tape measure, square, pencil
- Safety glasses and hearing protection
The Cut List
All seven pieces below come from one 4×8 sheet with no waste. Lay out the cut lines in this order on the plywood before cutting anything; confirm all pieces fit on the panel before the first saw pass.
| Part | Dimensions | Qty | Notes |
|---|---|---|---|
| Seat | 18″ x 16″ | 1 | Front corners rounded to 1″ radius |
| Back Panel | 18″ x 20″ | 1 | Top corners rounded to 2″ radius |
| Front Legs | 17″ x 3″ | 2 | Straight cuts |
| Rear Legs | 35″ x 3″ | 2 | Continuous piece forming leg + back support |
| Seat Support Rail | 16″ x 3″ | 2 | Side stretchers under seat |
| Armrests | 18″ x 4″ | 2 | Front corners rounded to 1″ radius |
The rear legs are the longest pieces at 35 inches. Place them along the 8-foot edge of the sheet first, then fit the remaining parts around them. A standard 4×8 panel yields these pieces with approximately 0.4 square feet of leftover scraps.
Cutting the Pieces
Straight cuts are fastest and most accurate with a circular saw guided by a clamped straightedge. A 4-foot aluminum level or a ripped strip of 1/4-inch plywood works well as a fence. Set the blade depth to 7/8 inch so it passes cleanly through 3/4-inch material with enough clearance to prevent binding.
For the curved cuts on the seat, back panel, and armrests, use a jigsaw with a 10-TPI wood blade. Mark the curves with a compass or trace a round object of the appropriate radius. Cut 1/8 inch outside the line first, then sand to the line with 80-grit paper wrapped around a sanding block. This two-pass approach prevents tearout at the curve.
Sand all faces through 120-grit before assembly. Plywood edges require extra attention because the exposed core plies absorb finish unevenly. Apply a thin coat of wood glue diluted 10:1 with water to all cut edges, let it dry for 30 minutes, then sand with 120-grit. This seals the fibers and reduces finish blotching by approximately 60 percent compared to unsealed edges.
Label each piece on the back face with a pencil after cutting. Front legs, rear legs, seat supports, and armrests are similar in width, and keeping them organized saves time during assembly.
Assembly Step by Step
Assembly happens in four stages: seat box, back attachment, leg attachment, and armrest installation. Complete each stage before moving to the next; glue sets in 30 minutes and full strength arrives at 24 hours.
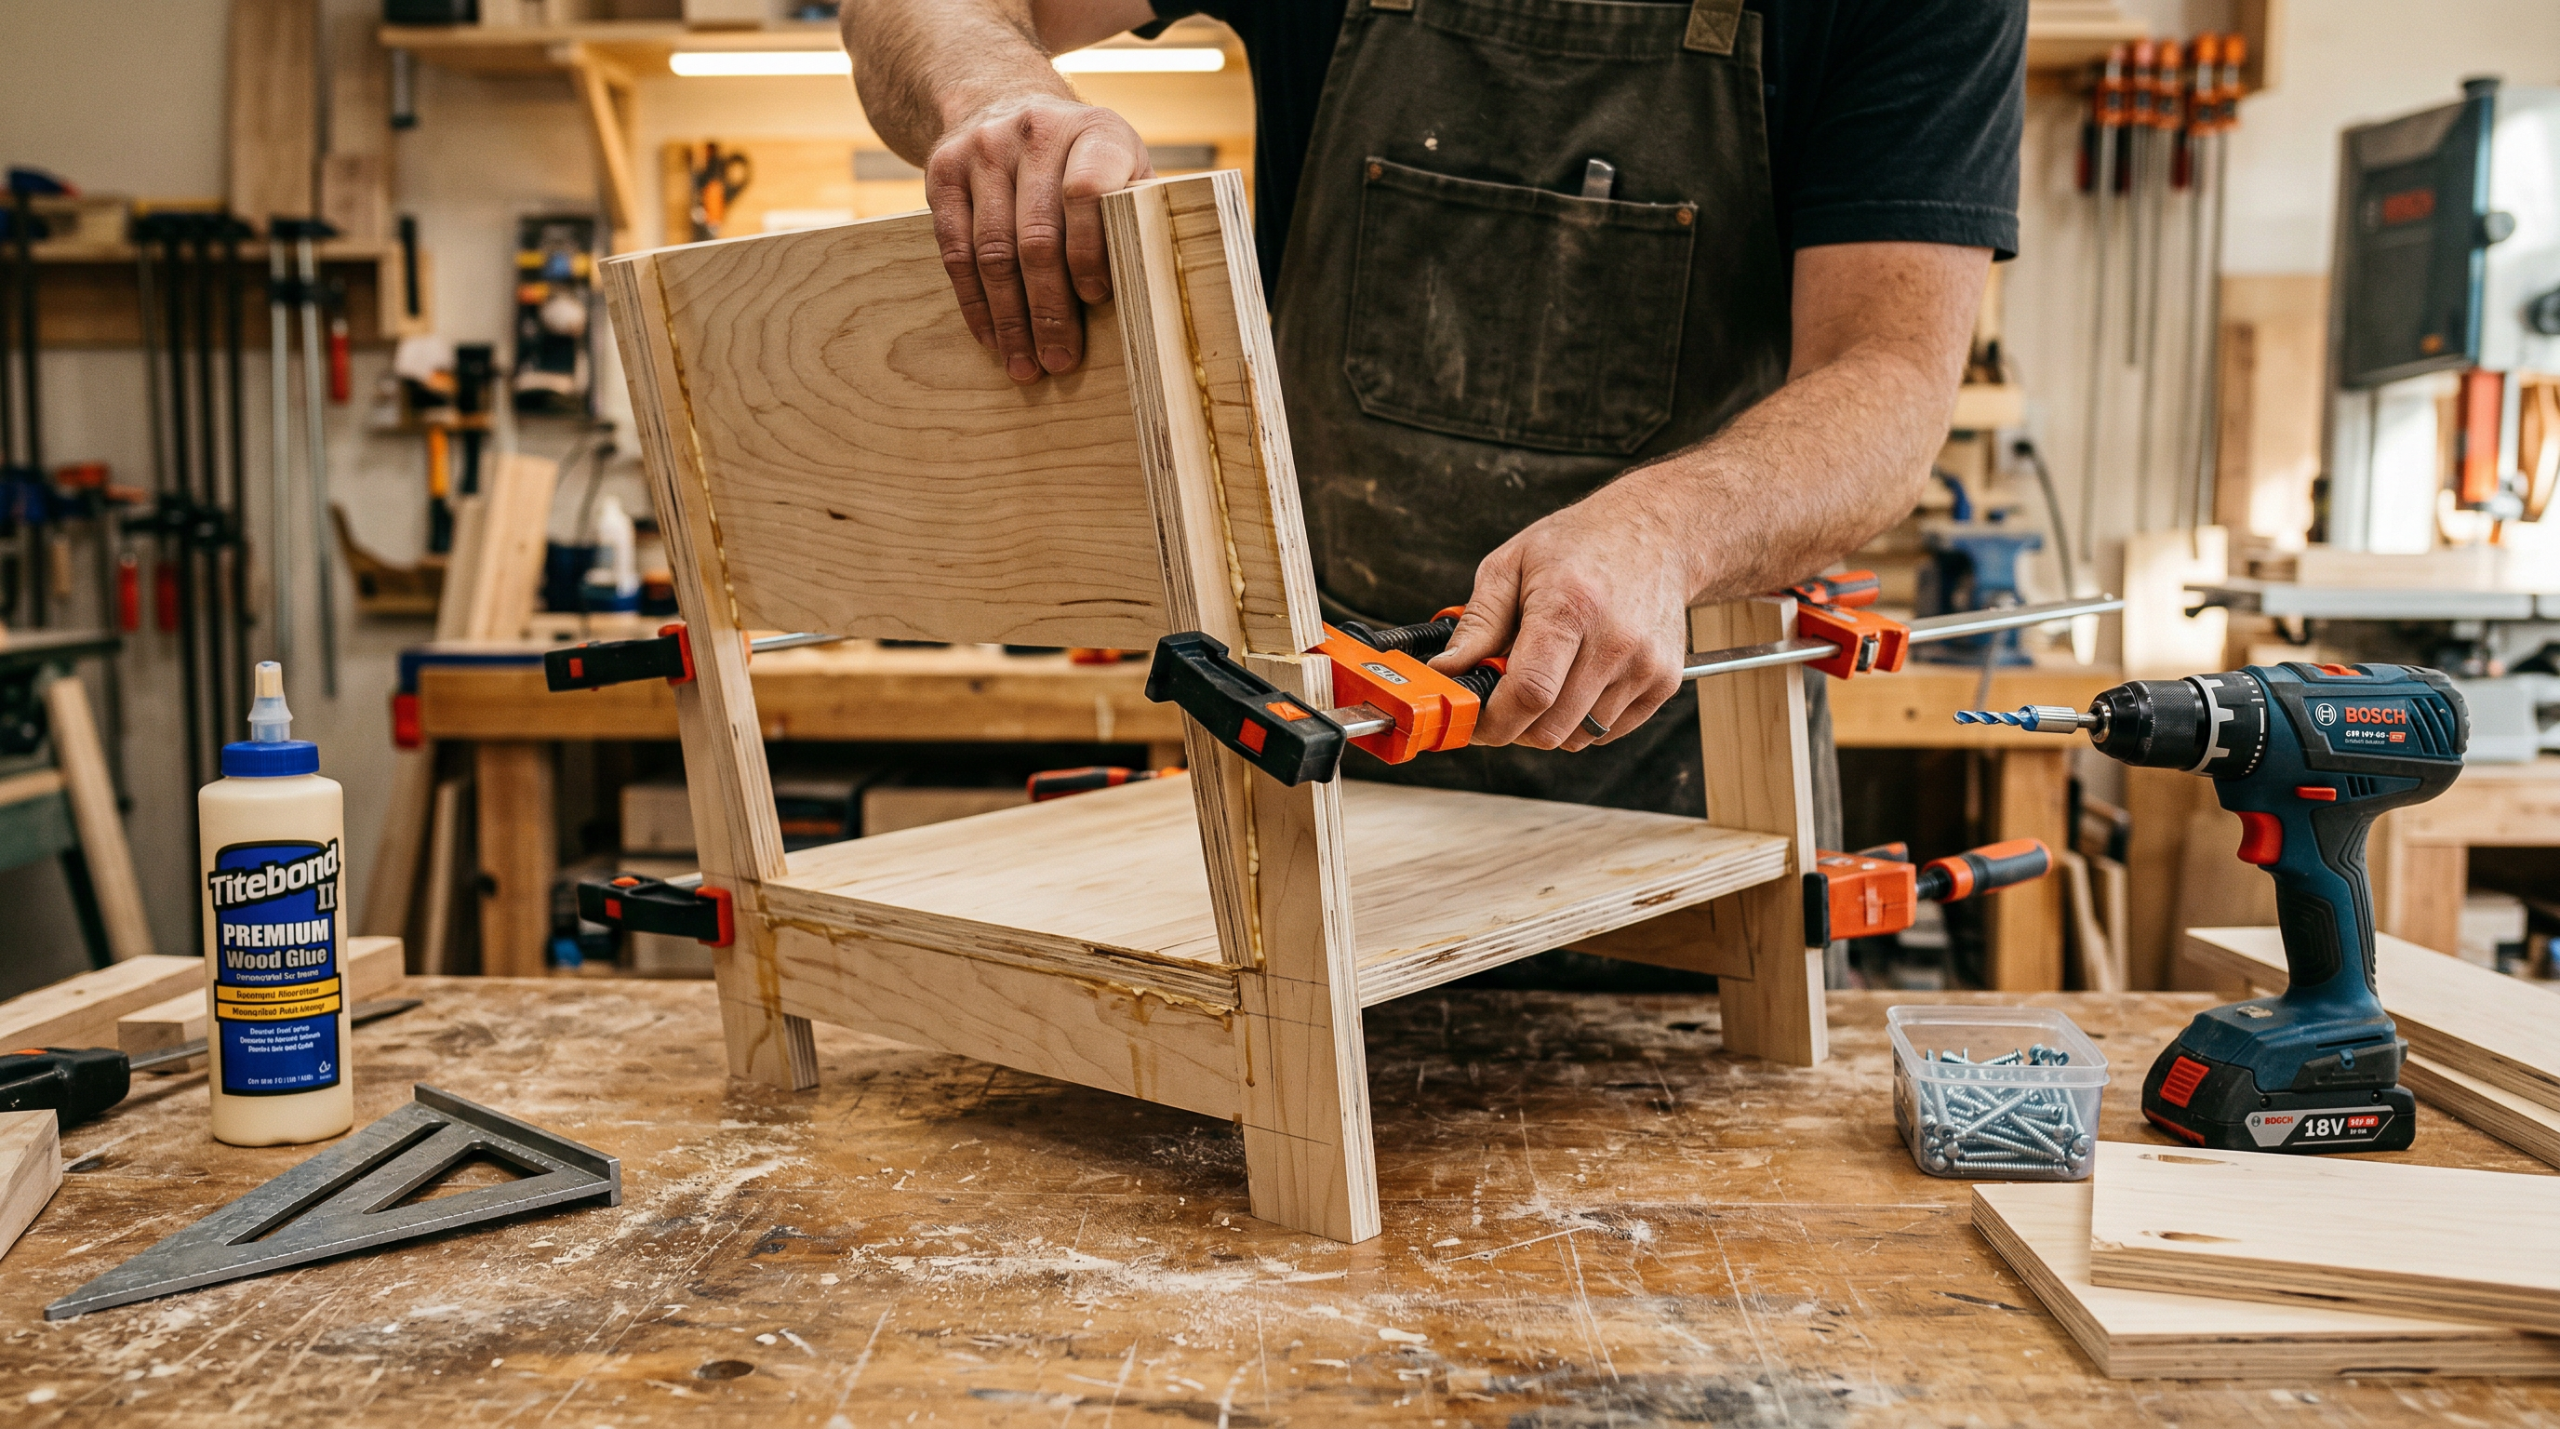
Stage 1: Seat box. Attach the two seat support rails to the underside of the seat panel using glue and two 1-1/4-inch screws per joint. Position each rail 1 inch from the side edge of the seat. Clamp and let the glue set for 30 minutes before proceeding.
Stage 2: Back panel. Stand the back panel perpendicular to the rear edge of the seat. The back panel sits centered on the seat width, leaving equal margins on each side. Apply glue to the joint, clamp, and drive three 2-inch screws through the seat into the bottom edge of the back panel. Countersink each screw 1/4 inch below the surface.
Stage 3: Legs. The rear legs attach flush with the outside face of the seat support rails. Apply glue along the top 16 inches of each rear leg where it contacts the seat assembly, then clamp and drive three 2-inch screws per leg through the support rail into the leg. Front legs attach to the front corners of the seat support rails using the same glue-and-screw method. Check all four legs for square using a framing square before the glue sets.
Stage 4: Armrests. Position each armrest level with the top of the seat support rail, bridging the front and rear legs. Glue the armrest to the top of both legs, then secure with two 1-1/4-inch screws per leg. The armrest front should overhang the front leg by 2 inches for a comfortable resting position.
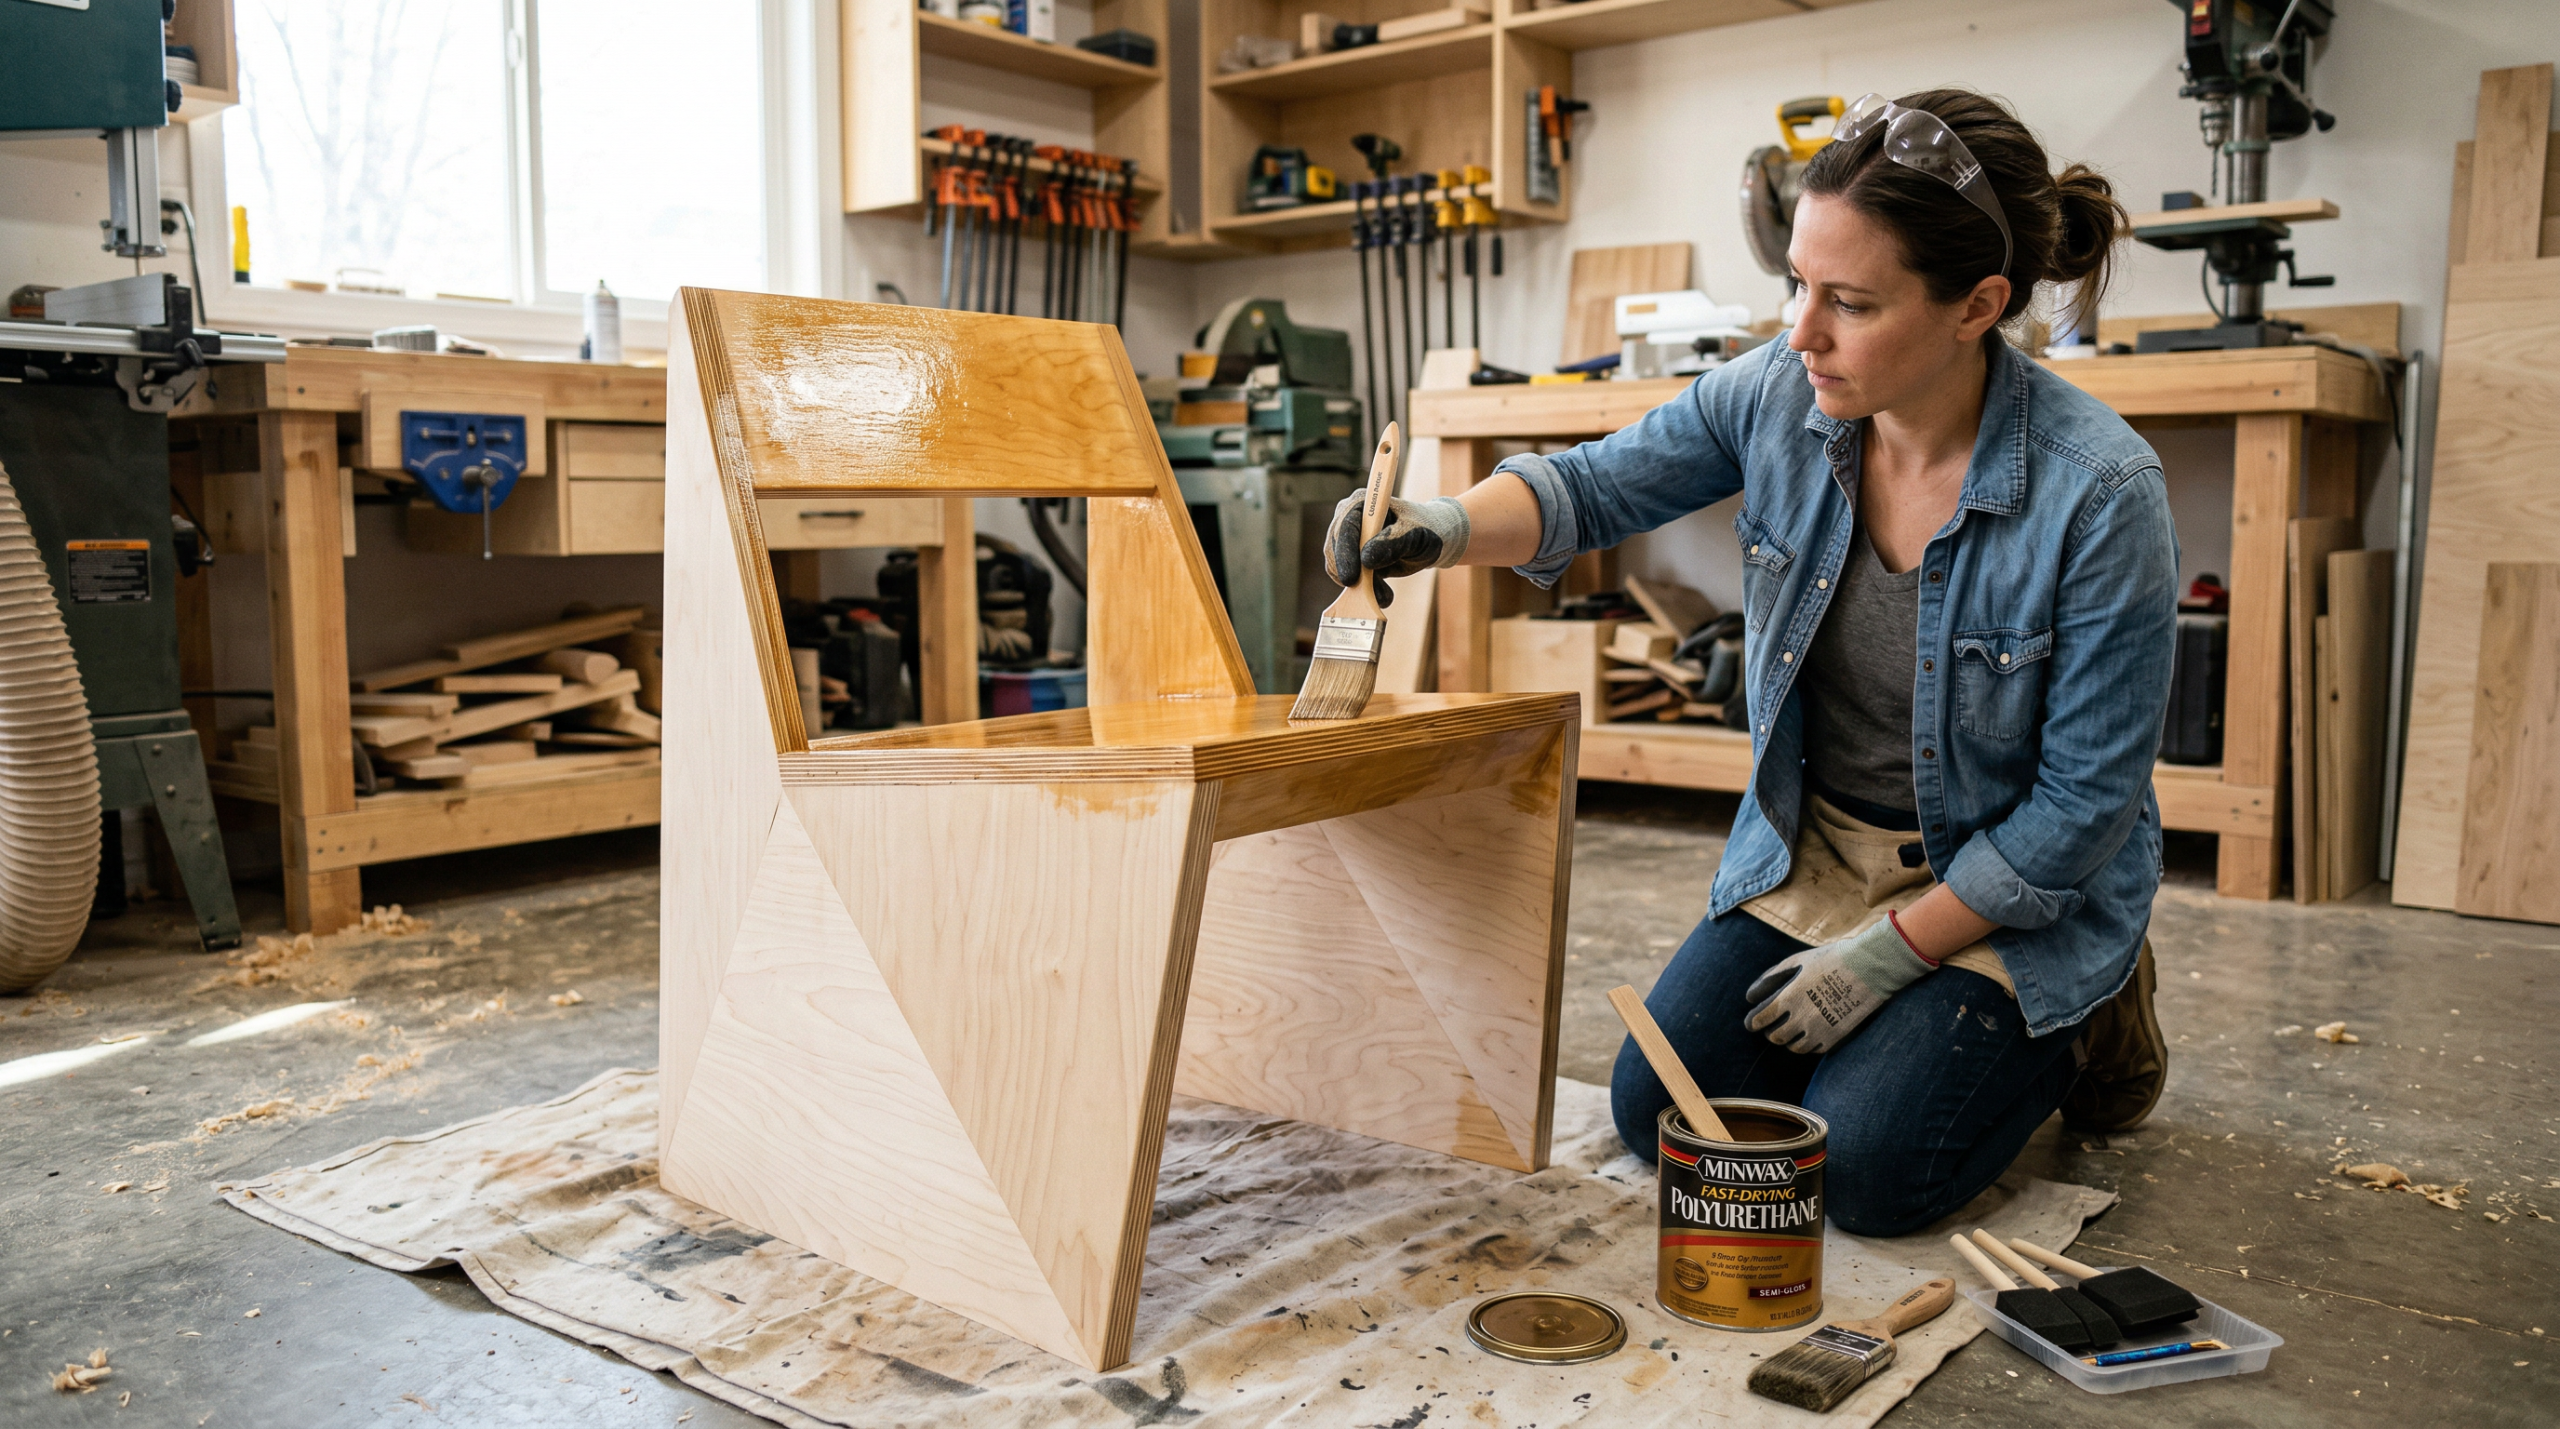
Finishing Options
Three finish types work well on a DIY plywood chair: paint, stain, and clear coat. Each has different prep requirements and visual results. The right choice depends on how the chair will be used and where it will sit.
Paint gives the cleanest look on plywood because it hides grain variation and edge inconsistencies. Apply one coat of water-based primer, sand with 220-grit, then apply two coats of latex paint. Total material cost for paint finishing runs $12 to $18. Interior-grade paint works fine for indoor chairs; exterior latex adds $4 to $8 but handles humidity better in garages or covered porches.
Stain highlights the wood grain but requires thorough edge sealing first (see the diluted glue method above). Apply a pre-stain wood conditioner before any oil-based stain to prevent blotching. Two coats of stain followed by two coats of polyurethane produces a durable surface. Stain finishing costs $15 to $25 in materials.
Clear coat is the fastest option. Two to three coats of water-based polyurethane over 220-grit-sanded plywood creates a natural look with good durability. A quart of water-based poly costs $12 and covers the entire chair with finish to spare. For outdoor use, switch to exterior-rated spar urethane at similar cost.
Tips for a Stronger Build
The single biggest improvement for joint strength is a dado groove at the seat-to-leg connection. A 3/4-inch dado cut 3/8 inch deep into the leg accepts the seat support rail and increases the glue surface area by 4 times compared to a butt joint. A router with a 3/4-inch straight bit or a table saw with a dado stack handles this cut. If you do not have those tools, a double-screw butt joint with glue performs adequately for most uses.
Glue selection matters more than screw count. PVA wood glue (Titebond II or equivalent) creates a bond stronger than the wood itself when surfaces are flat and clamped properly. Apply glue to both mating surfaces, not one. Spread it with a small brush or your finger to an even film, then clamp the pieces immediately. Screws in a glued joint serve as clamps during curing, not as the primary load-bearing fastener.
A few additional tips:
- Predrill every screw hole to prevent plywood from splitting at edges
- Countersink screws below the surface and fill with wood filler before finishing
- Check the chair for wobble after assembly; sand the bottom of any high leg rather than shimming
- Add rubber feet to all four legs to protect floors and prevent the chair from sliding
- Let glue cure for a full 24 hours before sitting in the chair
Frequently Asked Questions
How much weight does a DIY plywood chair hold?
A properly assembled plywood chair using 3/4-inch Baltic birch with glued-and-screwed joints holds 250 to 300 pounds. Adding dado joints at key connections increases this to approximately 350 pounds. The limiting factor is typically the rear leg-to-seat joint, so prioritize reinforcement there.
Do I need a table saw to build a plywood chair?
No. A circular saw with a straightedge guide handles all the straight cuts, and a jigsaw handles all curves. Many home centers also offer sheet goods cutting services at the point of purchase for $0.25 to $1.00 per cut. Starting with pre-cut straight sections reduces the tool requirement to a jigsaw, drill, and clamps.
What thickness of plywood works best for chair legs?
Three-quarter inch (3/4″) plywood is the minimum for structural parts like legs and seat supports. Thinner plywood such as 1/2-inch works for back panels where the load is lighter, however leg and support pieces in 1/2-inch plywood flex under body weight and fail at joints over time. Stick with 3/4-inch throughout for a single-sheet build.
How long does a plywood chair last?
An indoor plywood chair with polyurethane finish lasts 10 to 15 years under regular use. Outdoor durability depends on the finish; exterior spar urethane extends outdoor life to 5 to 7 years before refinishing. The joints, not the wood, typically fail first, so regluing every few years extends the lifespan significantly.
Can I modify the dimensions for a taller or shorter chair?
Yes. Standard seat height is 17 to 18 inches from the floor. Adjust front and rear leg lengths proportionally to raise or lower the seat. For a counter-height chair at 24 to 26 inches, add 7 to 8 inches to all leg pieces. Verify the modified cut list still fits within the 4×8 sheet before purchasing material.
Building a DIY plywood chair is one of the most cost-effective single-sheet plywood projects available. With $35 to $50 in material, 4 to 6 hours of work, and the cut list and steps above, the result is a solid, functional chair built to your exact specifications. Follow the glue-cure timeline, predrill every hole, and seal the edges before finishing, and the chair will hold up to years of regular use.

Leave a Reply