Quick Verdict: Well pump troubleshooting starts with three components in 90% of cases: the pressure switch, the pressure tank, and the capacitor. Before calling a plumber, check your circuit breaker and pressure switch first. Both fixes cost under $75 in parts and take less than two hours. A full submersible pump replacement runs $977–$2,827 professionally, so correctly diagnosing the actual failed component saves real money.
Last updated: April 2026 | 12 min read
In This Article
- Well Pump Troubleshooting: How Your System Works
- Key Well Pump Facts at a Glance
- Quick Diagnosis: Match Your Symptom to the Problem
- Well Pump Troubleshooting: Check Electrical First
- Diagnose and Replace the Pressure Switch
- Test and Recharge the Pressure Tank
- Replace the Capacitor: The #1 Cause of Pump Failure
- Well Pump Runs But No Water: 9 Possible Causes
- DIY vs. Professional Repair Costs
- Repair vs. Replace: When to Buy a New Well Pump
- Pros and Cons of DIY Well Pump Repair
- Final Verdict
- Frequently Asked Questions
Well Pump Troubleshooting: How Your System Works
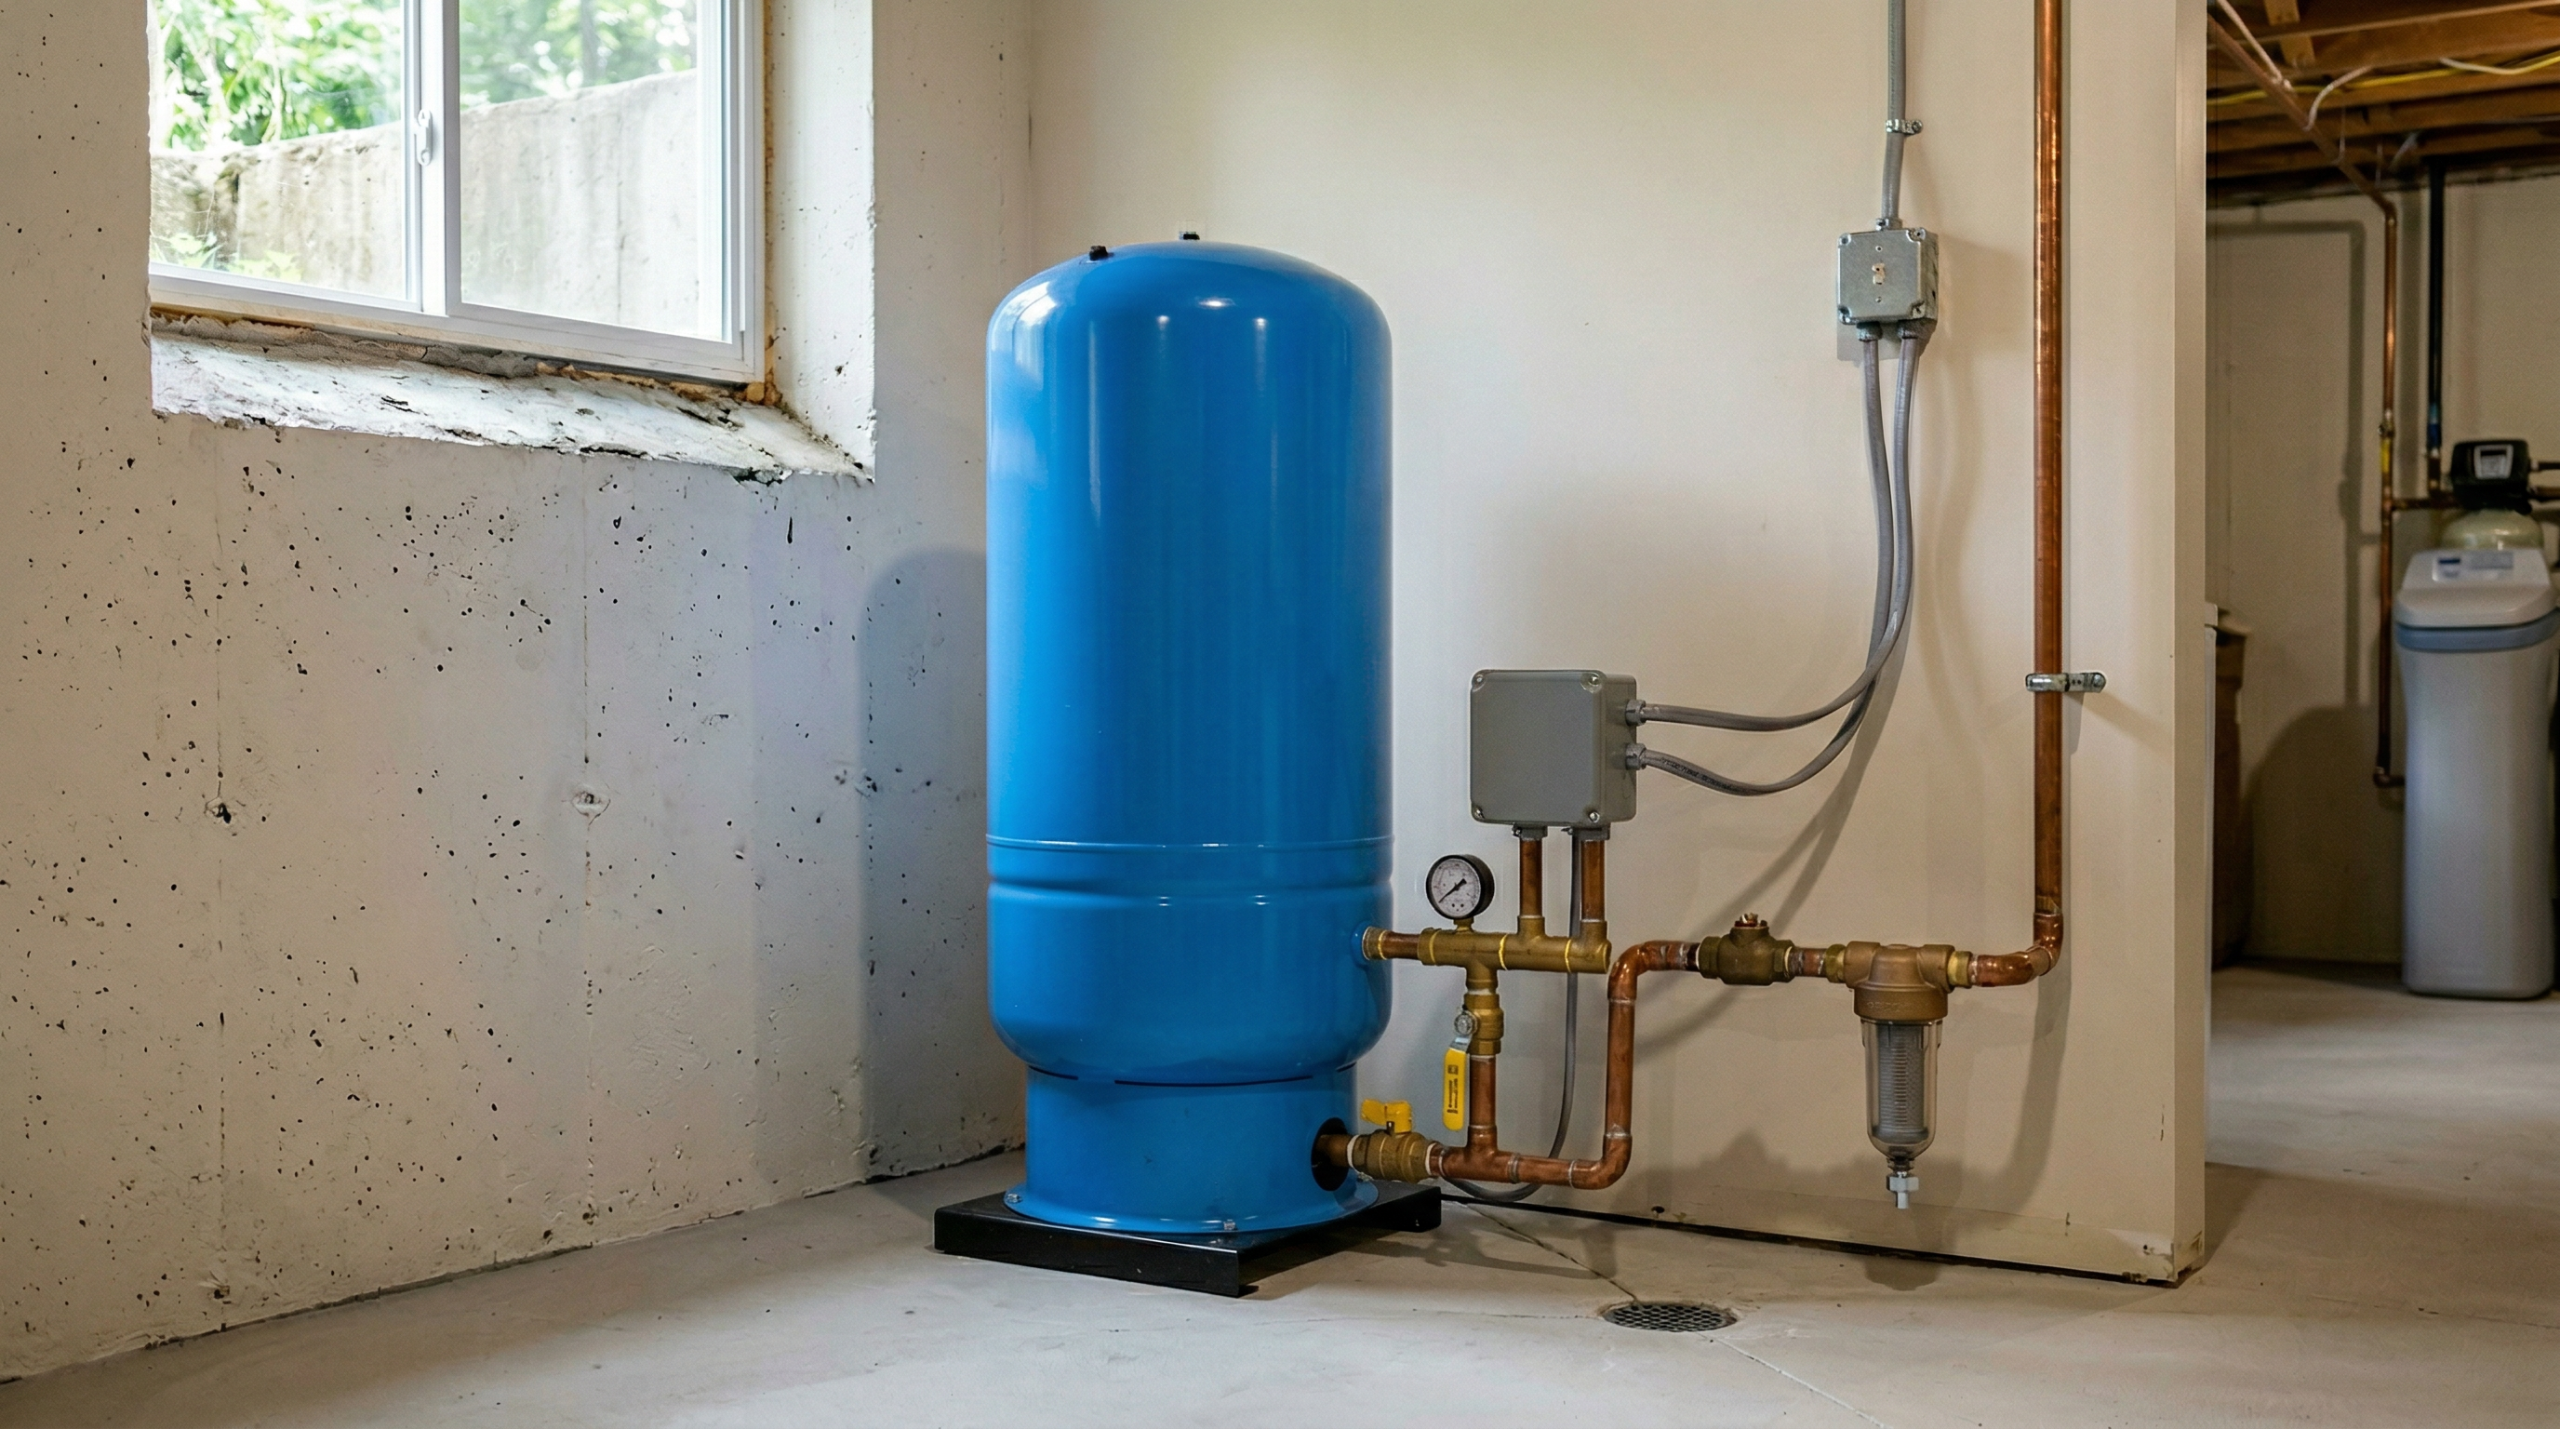
Effective well pump troubleshooting starts the moment your well pump is not working. Before you touch anything, understand which component does what. Your well water system has four core parts working together: the pump itself (either a submersible unit sitting 50–300 feet underground or a jet pump mounted above ground), a pressure tank storing pressurized water, a pressure switch sensing system pressure, and a check valve preventing backflow. When your well pump is not working, one of these four components has almost always failed.
Submersible pumps and jet pumps share the same pressure switch and tank, but their repair approaches differ significantly. These underground units push water up from depth and require pulling the unit from the well casing for any motor-level repair. Jet pumps, on the other hand, pull water up using suction and sit beside the pressure tank in your basement or utility room, making them far more accessible for DIY repair. Knowing your pump type before starting diagnosis saves time and avoids applying the wrong fix.
The pressure switch acts as the brain of the system. It monitors pressure continuously and signals the pump to start when pressure drops to the cut-in setting (typically 30 or 40 PSI) and stop when pressure reaches the cut-out setting (50 or 60 PSI). The pressure tank stores a reserve so the pump does not cycle on for every small draw, such as a single glass of water. A healthy system should hold pressure between cycles for 1–2 minutes at moderate household demand. If your pump runs more frequently, the pressure tank is the first place to check. As part of your broader spring home maintenance routine, testing the pressure tank pre-charge each year prevents the most common failure mode before it starts.
Key Well Pump Facts at a Glance
| Specification | Details |
|---|---|
| Average pump lifespan | 8–15 years (submersible); 10–15 years (jet pump) |
| Normal operating pressure | 30/50 PSI or 40/60 PSI (cut-in/cut-out) |
| Pressure tank pre-charge | 2 PSI below cut-in (28 PSI for 30/50 systems; 38 PSI for 40/60 systems) |
| Pump motor resistance (healthy) | Varies by HP: ~5.7–7.1 ohms (3/4 HP), ~4.2–5.2 ohms (1 HP), ~1.8–2.4 ohms (1.5 HP) at 230V |
| Pressure switch cost (DIY) | $25–$75 (Square D 9013 series is the standard) |
| Capacitor cost (DIY) | $15–$50 |
| Pressure tank cost (DIY install) | $200–$600 (Amtrol WellXTrol WX-101 to WX-202) |
| Full pump replacement (professional) | $977–$2,827 average; up to $4,500 for deep wells |
| Circuit breaker type | Double-pole 20A or 30A (240-volt circuit) |
| Most common motor-level failure | Capacitor failure (one of the most frequent causes of pump motor failure) |
Quick Diagnosis: Match Your Symptom to the Problem
Start your diagnosis here before opening any electrical panel or touching any component. Most well pump problems trace back to three components: the pressure switch, the pressure tank, or the capacitor. Match your symptom to the most likely cause, then skip to the relevant section.
| Symptom | Most Likely Cause | Go To Section |
|---|---|---|
| No water at all; pump silent | Tripped breaker or failed pressure switch | Electrical System; Pressure Switch |
| Pump hums but no water flows | Failed capacitor (most common) or seized impeller | Capacitor Section |
| Pump short cycles (rapid on/off) | Waterlogged pressure tank or failed bladder | Pressure Tank Section |
| Pump runs constantly, won’t shut off | Pressure switch stuck, low well yield, or major leak | Pressure Switch Section |
| Pump runs but no water at faucets | Dry well, broken drop pipe, or failed check valve | No Water Section |
| Low water pressure only | Pressure switch set too low or undersized tank | Pressure Switch Section |
| Air sputtering from faucets | Waterlogged tank or air entering the line | Pressure Tank Section |
| Breaker trips repeatedly | Shorted motor winding or wiring fault downhole | Electrical System |
| Grinding or clicking sounds | Worn bearings, debris in impeller, or relay chatter | Capacitor Section; call a pro |
Well Pump Troubleshooting: Check the Electrical System First
Every diagnostic sequence starts at the electrical panel. Your well pump runs on a 240-volt circuit protected by a double-pole breaker (two tandem handles linked together), typically rated at 20A or 30A. Before opening any pump component, go to your main panel and look for the breaker labeled “Well Pump” or “Water Pump.” A tripped breaker sits in the middle position between ON and OFF; reset it by pushing it fully to OFF and then back to ON.
However, do not reset a tripped well pump breaker more than once without investigating why it tripped. A breaker trips because the circuit detected excess current; this often signals a shorted motor winding, a locked impeller, or a wiring fault downhole. Resetting repeatedly without diagnosis burns out the motor further and creates a fire risk. The most costly DIY electrical mistakes on well systems come from ignoring repeated breaker trips and forcing a seized pump to keep running.
After confirming the breaker, also check the well disconnect switch. Most installations include a secondary disconnect box near the pressure tank, usually a grey metal box mounted to the wall within 10 feet of the tank. Verify the disconnect is in the ON position. On older systems, also check for blown fuses inside the disconnect; a standard residential well pump uses a 30-amp cartridge fuse. Replace any blown fuses with the identical amperage rating; never upsize a fuse to bypass a protection issue. If the breaker and disconnect both check out, move to the pressure switch.
Diagnose and Replace the Pressure Switch
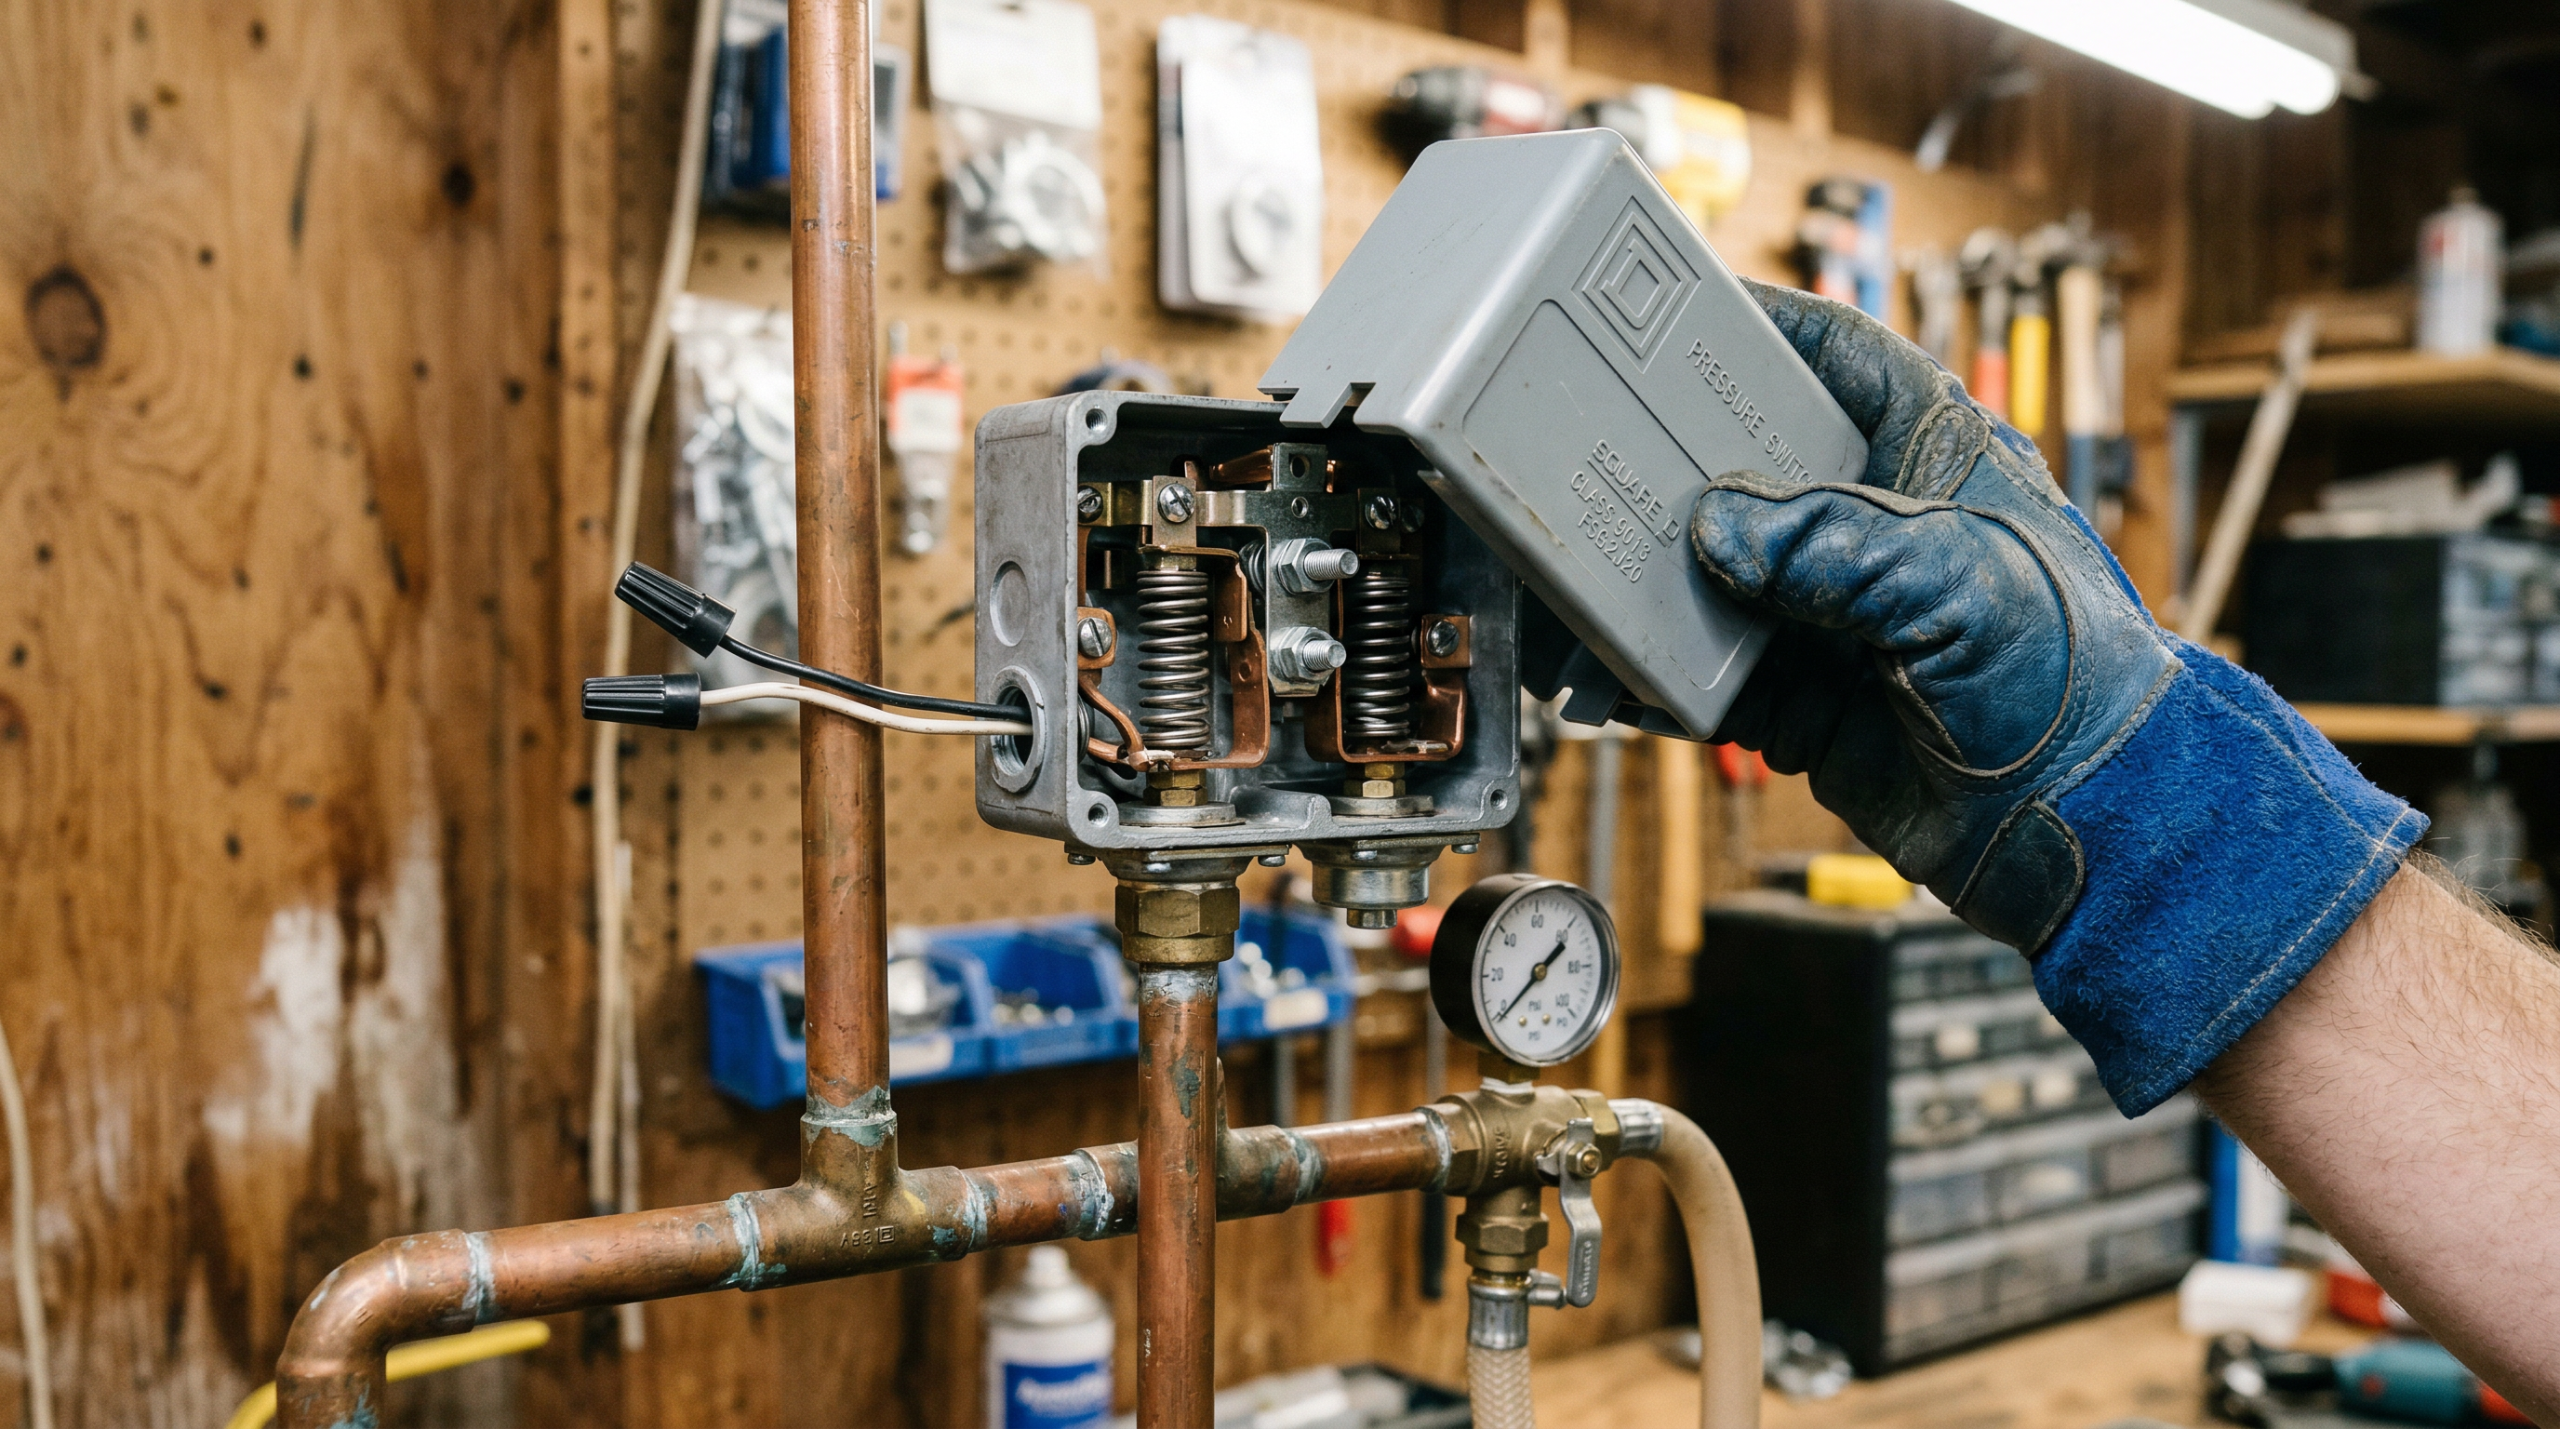
During any pump diagnostic process, the pressure switch is the second most common failure point after the capacitor. The switch sits on a small threaded port on the main water line near the pressure tank. Square D 9013 series switches are the industry standard; you’ll recognize them as a grey plastic box roughly the size of a deck of cards, with a conduit fitting on one side and a spring-nut adjustment on top. When a well pump won’t turn on or runs without shutting off, the pressure switch is the second thing to check after the breaker.
How to Inspect the Pressure Switch
First, shut off power at the breaker. Next, remove the plastic cover by loosening the center nut. Look for three failure signs: burnt or pitted electrical contacts (black carbon residue on the silver contact points), corrosion on the contact arms, and a clogged sensing port. The sensing port is the small threaded hole where the switch threads onto the pipe. Sediment regularly blocks this port, which prevents the switch from reading accurate pressure and causes erratic behavior. Clean the port with a toothpick or thin wire; do not use a drill bit, as enlarging the hole ruins the switch.
If the contacts show pitting deeper than 1mm or carbon buildup you cannot clean off with a pencil eraser, replace the switch. A Square D FSG2 costs $25–$40 at most hardware stores and is a direct replacement for the majority of residential installations.
Also note the switch’s PSI rating before purchasing: a 30/50 switch and a 40/60 switch are not interchangeable without adjusting your system’s operating pressure.
Step-by-Step Pressure Switch Replacement
- Shut off power at the breaker and verify with a non-contact voltage tester.
- Open a faucet to drain pressure from the system (watch the pressure gauge drop to zero).
- Photograph the existing wiring before disconnecting anything; four wires connect to the switch terminals.
- Unscrew the conduit fitting and disconnect the four wires from their terminals.
- Thread the old switch counter-clockwise off the pipe fitting. Wrap the new switch’s threads with Teflon tape (3–4 wraps clockwise).
- Thread the new switch onto the fitting by hand, then snug it with channel-lock pliers, roughly 1/4 to 1/2 turn past hand-tight.
- Reconnect the wires to the matching terminals using your photograph as reference.
- Replace the conduit fitting, restore power, and watch the pressure gauge climb to the cut-out setting.
Similarly, if you’re replacing a switch on a 40/60 system, confirm the new switch’s internal spring settings match your old unit. Most Square D switches ship preset to 30/50 from the factory; adjusting to 40/60 requires turning the range nut clockwise approximately two full turns.
The same systematic diagnostic approach applies to other home systems. For example, air conditioner troubleshooting follows an identical pattern: check electrical first, then test individual components before assuming the compressor has failed.
Test and Recharge the Pressure Tank
In well pump troubleshooting, short cycling (the pump turning on and off every 5–10 seconds) almost always points to a waterlogged pressure tank. A healthy bladder-style tank holds a pre-charged air cushion at 28 PSI (for 30/50 systems) or 38 PSI (for 40/60 systems). When the bladder ruptures, water fills the entire tank, the air cushion disappears, and the pump cycles on for every fractional pressure drop. Left unaddressed, short cycling destroys pump motor bearings within weeks.
Three Quick Tank Tests
First, the tap test: knock firmly on the tank from bottom to top. A healthy tank sounds hollow in the upper two-thirds (the air charge) and solid near the bottom (standing water). By contrast, a completely waterlogged tank sounds solid all the way up, like knocking on a solid steel drum.
Second, the Schrader valve test: locate the small valve stem on top of the tank (identical to a tire valve). With power off and pressure fully relieved, press the center pin. Air should hiss out. If water squirts out instead, the bladder has failed and the tank needs replacement.

Third, check the pre-charge pressure with a tire gauge. A healthy reading for a 30/50 system is 28 PSI; for a 40/60 system, 38 PSI. However, a reading significantly below target (say, 10–15 PSI) means the tank lost its air charge but the bladder remains intact, which is repairable.
How to Recharge the Pressure Tank
- Shut off power to the pump at the breaker.
- Connect a garden hose to the tank’s drain valve and open it fully to drain all water from the tank.
- Verify the tank is empty by confirming pressure reads zero on the gauge.
- Using an air compressor, add air to the Schrader valve until the gauge reads 28 PSI (30/50 system) or 38 PSI (40/60 system).
- Close the drain valve and restore power.
- Watch the pump fill the tank; it should cycle on once and hold pressure for at least 60 seconds before turning on again.
Amtrol WellXTrol tanks (WX-101, WX-202, WX-302) are the most widely installed residential tanks. The WX-202 (20-gallon) handles typical homes drawing 5–7 gallons per minute; the WX-302 (86-gallon) suits higher-demand households at 8–12 GPM. An undersized tank causes short cycling even with a perfect bladder because the air volume is too small to buffer pressure adequately. If you keep recharging the tank and short cycling returns within a month, the bladder has likely developed a slow pinhole; replacement at this point rather than repeated recharging is the correct fix.
Replace the Capacitor: The #1 Cause of Pump Failure
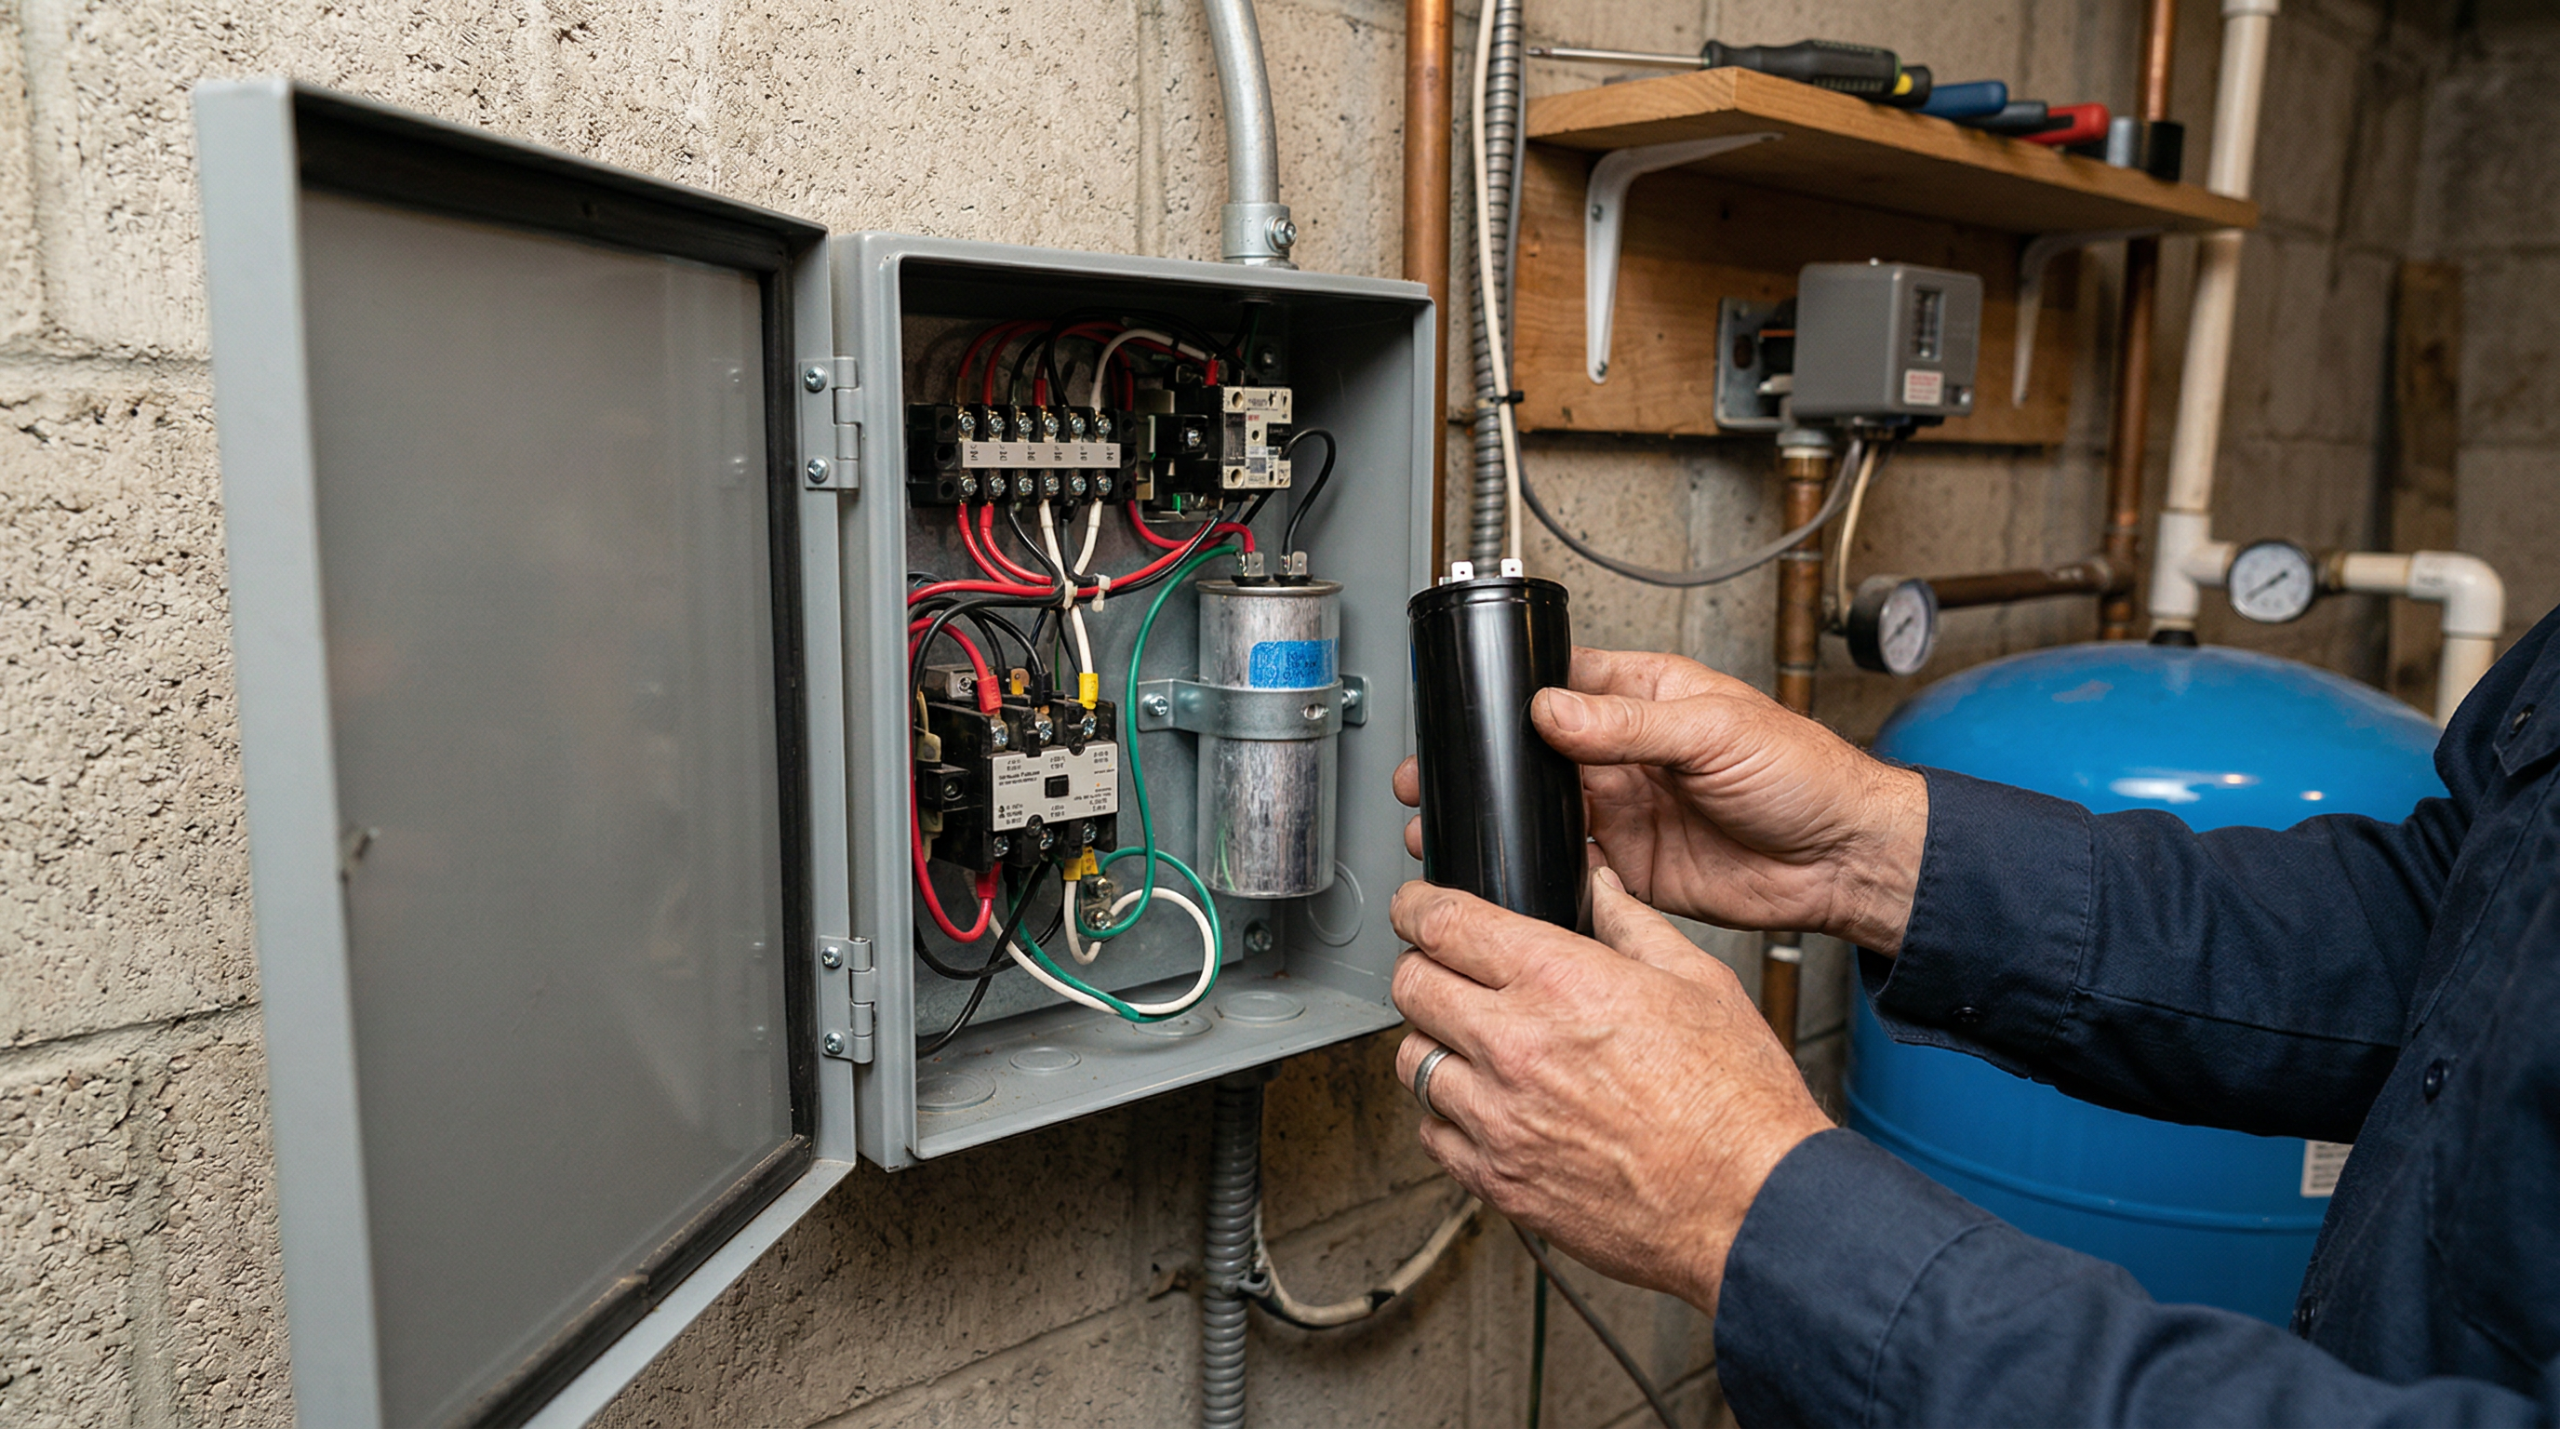
Capacitor failure is the component most well pump troubleshooting guides overlook, yet it is one of the most frequent causes of well pump motor failure according to HVAC and well service professionals. Despite this, few guides on the topic include a step-by-step replacement walkthrough. The capacitor provides the initial surge of electricity needed to start the motor. Without it, the motor receives power but cannot begin rotating: it hums, draws excessive amperage, and trips the breaker or burns the windings if left running.
On 3-wire submersible pump systems, the capacitor sits inside the above-ground control box. For jet pumps, it mounts directly to the motor housing. Either way, it looks like a silver or black cylinder, roughly the size of a D-cell battery, with two or three terminals on top. Visible signs of failure include a bulging or cracked case, oily residue leaking from the seams, and burn marks on the terminal area.
Step-by-Step Capacitor Replacement
- Shut off power at the breaker and at the disconnect switch; both, not one.
- Wait 5 minutes before touching any capacitor terminals. A charged capacitor holds lethal voltage even after power is cut. Discharge it by briefly shorting the terminals with an insulated screwdriver.
- Photograph the wiring connections before removing anything.
- Read the microfarad (MFD) and voltage rating printed on the old capacitor’s label. A typical residential well pump uses a 25–100 MFD start capacitor rated at 220V or 330V.
- Purchase a direct-replacement capacitor with identical MFD and equal or higher voltage rating. Expect to pay $15–$50 at an HVAC supply house or online.
- Disconnect the wires from the old capacitor and connect them to the new unit in the same positions.
- Secure the capacitor in its mounting bracket, restore power, and test.
For 2-wire pump systems, the capacitor is built into the motor itself (downhole) and is not field-replaceable. If a 2-wire pump hums and trips, the motor likely needs professional evaluation or replacement rather than a capacitor swap.
Well Pump Runs But No Water: 9 Possible Causes
A running pump with no water delivery represents one of the most urgent scenarios in residential well systems. Unlike a silent motor failure, a running pump with no output actively risks burning out the motor through heat and dry-run damage. Turn the pump off immediately and work through these nine causes in order of likelihood.
- Dry well or low water table. During drought or after heavy draw-down, the well yield drops below the pump intake level. Signs include sediment-filled water before flow stops completely. Leave the pump off for 4–8 hours and attempt a restart; if the well has recovered, flow returns.
- Failed check valve. The check valve prevents water from draining back down the drop pipe. When it fails, water drains back immediately after the pump shuts off, leaving the pump running against empty pipe on the next cycle. Jet pumps use a foot valve at the intake; both are replaceable without pulling the pump if accessible.
- Broken drop pipe. A cracked or separated drop pipe (the plastic pipe connecting the submersible pump to the surface) recirculates water back into the well casing instead of delivering it to the pressure tank. This requires pulling the pump.
- Worn pump impellers. Impellers erode from sand and sediment over years of service. Worn impellers spin freely but move little water, especially noticeable in older pumps past 10 years of service.
- Clogged inlet screen. Many submersible pumps have a stainless mesh screen protecting the impeller from debris. Heavy sediment loads block the screen and starve the pump of water.
- Major plumbing leak. A burst pipe or large irrigation leak consumes all pump output before it reaches any faucet. Check the pressure gauge: if it never climbs above 10–15 PSI while the pump runs, a large leak is likely.
- Priming issue (jet pumps only). Jet pumps lose prime if air enters the suction line through a cracked fitting or a failing foot valve. Re-prime by filling the pump housing with water through the priming port.
- Broken pump shaft. A snapped motor shaft physically disconnects the motor from the impeller assembly. The motor runs, but nothing pumps.
- Air lock in the line. After any system repair, air trapped in the drop pipe prevents water delivery. Slowly open a faucet and allow the system to purge the air over 2–3 minutes before concluding the pump has failed.
DIY vs. Professional Repair Costs
The cost differences between DIY and professional well service are substantial. Sound diagnostic work before calling a contractor prevents paying a $150 diagnostic fee on a $30 part. In most well pump not working situations, the fix costs under $75. Knowing these numbers before you start helps you decide when to tackle the work yourself and when calling a licensed well contractor makes more financial sense.
| Repair | DIY Parts Cost | Professional Total | DIY Savings |
|---|---|---|---|
| Pressure switch | $25–$75 | $100–$225 | $75–$175 |
| Capacitor | $15–$50 | $90–$200 | $75–$150 |
| Pressure tank recharge | $0 (tools only) | $75–$150 | $75–$150 |
| Pressure tank replacement | $200–$600 | $800–$1,500 | $600–$900 |
| Control box replacement | $60–$200 | $250–$500 | $190–$300 |
| Jet pump replacement | $230–$500 | $600–$1,200 | $370–$700 |
| Submersible pump replacement | $275–$800 | $977–$2,827 | $700–$2,000+ |
Professional service costs include a $150–$250 diagnostic fee (often credited toward the repair), plus $45–$150 per hour in labor. For any repair requiring a pull rig to retrieve a submersible pump from a deep well, professional service is generally the correct choice; not because the repair itself is technically difficult, but because the specialized lifting equipment costs $300–$800 per day to rent and requires two people to operate safely.
Repair vs. Replace: When to Buy a New Well Pump
Most well pump problems eventually lead to the repair-versus-replace decision, which follows a straightforward framework based on three factors: pump age, repair cost relative to replacement cost, and failure frequency. Use the criteria below to make the call without guessing.
Replace the pump when any of these three conditions apply. First: the pump is over 12 years old and needs a repair costing more than 50% of a new pump’s cost. A new submersible pump runs $275–$800 for the unit alone; spending $400 repairing a 13-year-old motor on the verge of another failure is rarely worthwhile. Second: the pump has failed twice in three years. Repeated failures signal a systemic problem: worn bearings, sand intrusion, or chronic electrical stress, not a one-off component failure. Third: the pump motor resistance reads far outside the expected range for its horsepower rating on a multimeter (check the motor nameplate specs), or reads infinite (open circuit). Either reading confirms the motor windings have failed and no surface-level repair resolves it.
Conversely, repair makes clear financial sense when the pump is under 8 years old and the failed component is a pressure switch, capacitor, or pressure tank. These parts cost $15–$75 and have no bearing on the pump motor’s remaining service life. A 5-year-old pump with a failed pressure switch is not a dying pump; it’s a pump with a $30 problem.
Also consider pump performance before the failure. If pressure was dropping gradually over the past year and water sometimes ran brown or sediment-filled, the pump impellers are likely eroding from sand and the system is approaching end of life regardless of the triggering failure. In those cases, a full replacement prevents the next failure from happening at 2 a.m. on a holiday weekend.
Pros and Cons of DIY Well Pump Repair
DIY well pump troubleshooting is accessible for surface components but requires professional involvement for downhole work. Review the trade-offs below before starting any repair.
Pros
- Pressure switch replacement saves $75–$175 over professional service
- Capacitor swap costs $15–$50 in parts versus $90–$200 professionally
- Tank pre-charge costs nothing if you own a tire gauge and compressor
- Above-ground repairs complete in 1–3 hours without waiting for a service appointment
- DIY diagnosis prevents unnecessary service calls ($150–$250 diagnostic fee)
- Hands-on familiarity with your system helps you catch problems earlier
- Surface-level repairs (switch, capacitor, tank) require only basic tools
Cons
- 240-volt wiring carries lethal voltage; capacitors hold charge after power is cut
- Submersible pump pulls require specialized equipment and two-person crews
- Failed DIY attempts on the motor level double total repair costs ($600–$1,500+)
- Well contamination after opening the system requires sanitization with bleach solution
- Misdiagnosis replaces the wrong component and delays the real fix
- Some jurisdictions require licensed contractor permits for well system work
Final Verdict
Most homeowners attempting well pump troubleshooting for the first time find the problem is simpler than they feared. The three most common failures (a tripped breaker, a failed pressure switch, and a bad capacitor) all sit above ground, cost under $75 to fix, and take less than two hours to address without professional help. Starting at the breaker and working down through the pressure switch and capacitor before assuming the pump motor has failed resolves the majority of well pump not working calls with a fraction of the professional repair cost.
The cases where DIY does not make sense are specific and clear: any repair requiring the pump to be pulled from a deep well, any situation involving repeated breaker trips from downhole wiring faults, and any system where the well casing has been opened and requires post-repair sanitization. These jobs warrant a licensed well contractor not because of mechanical complexity, but because of equipment requirements and safety considerations going beyond a homeowner’s typical toolkit.
From a value standpoint, learning to diagnose and replace a pressure switch or capacitor pays for itself the first time you avoid a $150–$250 service call diagnosing a $30 part. The submersible well pump troubleshooting steps in this guide apply to the vast majority of residential systems, specifically 3/4 HP to 1-1/2 HP submersible pumps serving homes with 4–8 inch well casings, which covers the majority of residential installations.
For a complete pump motor failure on a pump older than 12 years, the well pump troubleshooting process is finished and replacement with a modern unit (Franklin Electric or Goulds are the two dominant brands in residential service) provides a fresh 8–15 year service window. Address the pressure tank and switch at the same time to avoid revisiting the system within the year. Above all, verify the actual failed component before ordering parts; a few minutes with a multimeter and the diagnostic table above prevents wasted money on the wrong repair.
Frequently Asked Questions
How long does a well pump last?
Troubleshooting aging equipment starts with understanding service life. Submersible well pumps average 8–15 years depending on water quality, pump sizing, and cycle frequency. Jet pumps, mounted above ground and accessible for maintenance, often reach 10–15 years. Pumps in wells with high sand or sediment content wear out faster, sometimes in 5–7 years, because abrasive particles erode the impellers. Annual pressure tank pre-charge checks reduce short cycling, which is the single biggest factor shortening pump life.
How much does well pump repair cost?
DIY well pump repair costs $15–$600 depending on the failed component: a capacitor runs $15–$50, a pressure switch $25–$75, and a replacement pressure tank $200–$600 for parts alone. Professional repair, including diagnostic fee and labor, ranges from $100–$225 for a pressure switch to $977–$2,827 for a full submersible pump replacement. Most homeowners spend $300–$600 on professional service for problems a DIYer resolves for $25–$75 in parts.
Why does my well pump keep cycling on and off?
Short cycling (rapid on-off cycling every 5–30 seconds) during well pump troubleshooting almost always leads back to the pressure tank: either the air charge is depleted or the bladder has failed. A healthy bladder-style tank holds 28 PSI (on 30/50 systems) or 38 PSI (on 40/60 systems) of pre-charged air. When the bladder ruptures, water fills the tank completely, eliminating the air buffer and forcing the pump to cycle for every small pressure drop. Test the tank with a tire gauge at the Schrader valve: air should come out, not water.
How do I know if my pressure tank is bad?
Three tests confirm a failed pressure tank. First, knock on the tank: a healthy tank sounds hollow in the upper portion; a waterlogged one sounds solid all the way up. Second, press the Schrader valve pin with power off and pressure relieved: air indicates a healthy bladder, water indicates a ruptured one. Third, check air pressure with a tire gauge: a reading near zero when the system is fully depressurized and drained confirms the air charge is gone, pointing to bladder failure or a leaking valve stem.
What causes a well pump to lose pressure?
Pressure loss during well pump troubleshooting traces back to five main causes in residential systems. A failing pressure switch set too low keeps the pump from reaching adequate cut-out pressure. Meanwhile, a waterlogged pressure tank delivers water in short bursts rather than steady supply. Worn pump impellers reduce output volume, especially noticeable in pumps over 10 years old. A significant plumbing leak consumes pump output before it reaches the faucets. Finally, declining well yield during drought or peak season lowers available water volume, which reduces deliverable pressure regardless of how well the equipment works.
Do I need to sanitize my well after pump work?
Sanitization is strongly recommended after any repair involving opening the well casing, replacing the pump, or working on components inside the well bore. The standard procedure uses household bleach (unscented, 5.25% sodium hypochlorite) dosed by well diameter and depth to achieve 50–100 ppm chlorine concentration. For a typical 6-inch well with 100 feet of standing water, roughly 5 cups of bleach is needed; exact volumes vary by casing size. Circulate the solution through the system and let it sit for 12–24 hours before flushing. Skip this step and you risk introducing surface bacteria into your drinking water supply. Repairs limited to above-ground components such as the pressure switch, pressure tank, and capacitor do not require well sanitization.
Is DIY Well Pump Replacement Realistic?
When well pump troubleshooting confirms a jet pump failure, DIY replacement is often realistic. Replacing an above-ground jet pump is a practical project requiring basic plumbing and electrical skills, a 4–6 hour time commitment, and roughly $230–$500 in parts. However, swapping a submersible pump involves pulling hundreds of feet of drop pipe and electrical wire from a narrow well casing, which requires a lifting rig, at minimum two people, and physical working conditions most homeowners lack the equipment to manage safely. For submersible well pump troubleshooting and all surface-level repairs (switch, capacitor, and tank), DIY is the right call. When pulling the pump itself, hire a licensed well contractor.

Leave a Reply